- Home Page
- Simple Kites
How to Build Kites
Three Simple Kites for Adults or Big Kids!
If you want to know how to build kites, you are at the right place. These three super-simple kites are quick and easy, yet fly really well.

To give you some choice while still keeping things simple, I have chosen to do a diamond, a delta, and a sled. Don't worry, the delta is very basic!
As well as instructions, these pages feature a short video of each kite in flight.
It's motivating to see the end result floating about in the sky! Even though you're learning how to build kites in a very quick and easy way.
Each kite is sized so that it should fit comfortably into the trunk (boot) of even a fairly small car. Otherwise, someone in the back seat could hang on to it.
Getting back to the Simple Diamond, Simple Delta, and Simple Sled, these designs are big enough so you don't feel you are flying a "small kite for kids"!
That's right, these designs are aimed at adults or teenagers. This is mainly because in moderate wind they might be too much for a small child to handle. Children over eight years old should have enough strength, though.
(Regarding that pinnable image—it's much bigger when pinned.)
Click on the three pictures below to see building instructions.

Construction time: less than 30 minutes.
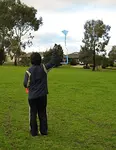
The second outing with the Simple Diamond resulted in a good high flight at about 200 to 300 feet altitude.
Another outing with this kite saw it soaring to over 350 feet in perfect winds under an overcast sky.

Construction time: less than 90 minutes.
After a few outings in overly windy conditions, the Simple Delta finally had a good high flight in better weather.
Months later, we pulled this delta out again for some delightful flying after gusty winds smoothed out.

Construction time: less than 40 minutes.
The very first outing with the Simple Sled was a great success!
Quite a few months later, this sled kite performed admirably in strong thermal conditions on a cloudy spring day.
The materials and tools for making these kites are very easy to find and cheap to buy. In fact, you'll probably find most of them around the house somewhere.
If you're curious, I've also put together a page on the reasons why it's a good idea to make your own kite.
Chances are, you've already checked out how to build kites using the Simple Diamond instructions up there. However, is the methodical step-by-step approach your style? Instead, you might enjoy a basic kite-making discussion that gives free rein to your creativity and craft skills!
How to Build Kites to Suit YOU
Here are the strong points of these kite designs:
The diamond kite is super reliable in flight, even if you don't make it perfectly. The long tail keeps it pointing into the wind, even when the wind is fairly fresh.
The delta kite will perform much better than the other two. In other words, it will spend a lot of time at a steep line angle. Sometimes it will go right over your head if it encounters any rising air on a warm day!
The sled kite is the most convenient to take anywhere. The kite simply rolls up, takes very little space, and is unlikely to be damaged in transit.
Here are the weak points of these kite designs:
The diamond flies at a modest line angle most of the time. And that long tail can get caught in things if you aren't careful.
The delta won't tolerate strong or even fresh winds. Too much wind will cause it to become unstable, and even break in extreme cases.
The sled doesn't like the rough air near ground level. Unless you fly it at a beach, you might find it needs to get well above tree height before it really starts behaving itself and flying reliably.
Wind-Speed Handy Reference
Light Air
1-5 kph
1-3 mph
1-3 knts
Beaufort 1
Light breeze
6–11 kph
4–7 mph
4–6 knts
Beaufort 2
Gentle ...
12–19 kph
8–12 mph
7–10 knts
Beaufort 3
Moderate ...
20–28 kph
13–18 mph
11–16 knts
Beaufort 4
Fresh ...
29–38 kph
19–24 mph
17–21 knts
Beaufort 5
Strong ...
39–49 kph
25–31 mph
22–27 knts
Beaufort 6
High Wind
50-61 kph
32-38 mph
28-33 knts
Beaufort 7
Gale
62-74 kph
39-46 mph
34-40 knts
Beaufort 8
But these are minor problems! After learning how to build kites from the instructions here and getting a little flying practice, you'll soon learn to cope one way or another. I've just mentioned the pros and cons here to give you a better idea of which design might suit your circumstances best.
Dacron, in 20- or 30-pound strength, is ideal for flying these kites. Otherwise, cheap knitting yarn should have sufficient strength for flying in reasonably light winds—say, up to 15 kph. I did a pull test on a length of acrylic knitting yarn, and it appeared to have at least the strength of a 20-pound line. It's a bit thick for flying really long lengths, but it's readily available in the shops!
Flying Tips
All these kites are designed for fairly light to moderate winds. So, assuming there is a reasonable breeze blowing outside, head out with kite and flying line attached.
If you can hear a little leaf noise in the trees, that should be fine. Stand with your back to the wind, and have a helper hold up the kite some distance away—say, 15 meters (50 feet). When they let go, the kite should climb away to above treetop height—unless the trees are huge in your area!
If your kite refuses to fly properly, there could be too much
wind. Or a dowel or two might be very uneven in stiffness along its
length. If a much longer tail doesn't solve the problem, just try making
the whole kite again. Chances are, the new one will fly much better.
If you can hardly feel the breeze against your face, it's likely there is simply not enough wind to fly! Just wait for better weather, or act like a kid and tow the thing into the air! Very often there will be more wind higher up, and you will be surprised to feel your kite pulling firmly on the line.
Now you can tell your friends you know how to build kites and fly them as well.
You Might Like These
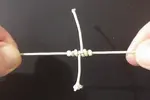
Knot Tying Instructions - All The Kiting Knots Used For MBK Designs
These knot tying instructions cover every knot used in making the whole range of MBK designs.
Kite Plans For The MBK Series Of Kites.
Kite plans, as opposed to step-by-step instructions, are handy for experienced kite builders. Here's plans for dowel / bamboo sparred kites with plastic sails.
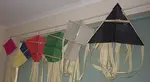
How To Make Soft Kites - Easily And Very Cheaply!
Learn how to make soft kites, from nothing more than plastic bags and packing tape. Only sound and well-tested designs here. All is explained, step by step with large photos.
How To Make Paper Kites - Even The 'Sticks' Are Just Paper & Tape!
Learn how to make paper kites, from just A4 or Letter copier paper and sticky tape. Explained step by step with close-up photos. Only sound and well-tested designs here.
How To Make Indoor Kites - Just Paper, Tape and Plastic Sheet!
Learn how to make indoor kites, from just A4 or Letter 80gsm paper, sticky tape and plastic sheet. Step by step with photos. Well-tested designs.
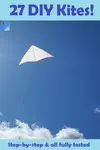
How To Make A Kite - 27 Kites! Illustrated Step-By-Step Instructions
Learn how to make a kite, 8 types to choose from, each in 3 sizes! Plus 3 Box kites. Full step-by-step instructions.
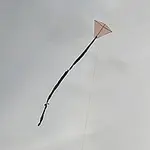
Make A Kite For Kids - The MBK Tiny Tots Diamond
This MBK kite for kids is about as simple as a Diamond can get! Do you have some bamboo BBQ skewers, tape and some plastic bags?


