- Home Page
- For Small Kids
A Kite for Small Kids
The MBK Tiny Tots Diamond
Here are step-by-step instructions to make a very simple kite for kids. It involves no gluing—just cutting with scissors, sticking with tape, and one knot. It's so quick that if any damage occurs, you can have another one ready in minutes!
 My non-kiter wife sees success!
Kite making for kids doesn't take much.
With no previous experience, my wife made this design in about 35 minutes. And yes, it flew great! She commented that if she made another one, the time taken would be more like 15 minutes.
The photo shows the little diamond, which May made in light-blue shopping-bag plastic, hovering just off the ground in a very light breeze.
With every small gust of wind, the kite would soar up much higher.
This design is so light-pulling, you can forget about the usual Dacron or nylon flying line if you want to.
Polyester sewing thread is quite strong enough!
Here Are the Instructions
Absolutely everything needed to make this child's kite is in the following list:
- somewhere flat to work
- plenty of thin colored plastic, in sheets or bags
- two bamboo BBQ skewers, 30 centimeter or 12 inch (possibly the only thing you might need to buy)
- clear sticking tape as used in offices
- a ruler
- a black marking pen—for example, a felt-tipped laundry marker
- scissors, big enough to snip the skewers
- polyester sewing thread
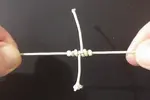
The following nine steps are designed for maximum speed at the expense of some accuracy. However, the human eye is good at lining things up and dividing lengths in half—so the end result should fly fine! It looks a lot, scrolling through, but each step is very short and easy. There's nothing hard about making this kite for kids.


That's our 2 1/2-year-old Aren down there in the video, towing this kite along after being prompted to "run! run! run!" He had fun! Any child up to the age of six or so should enjoy doing the same.
If there is a bit of wind, the kite will fly while the child just stands and hangs on to the winder.
You are now ready to fly the kite! That's weather permitting, of course. I hope you've enjoyed this experience of making a kite for kids!
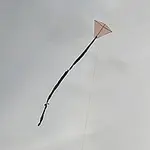
 A Tiny Tots Diamond hovers, lit by the setting sun
The shot of the yellow diamond was taken near sunset. See how the kite and its tail are being lit from the right.
If there is no wind, with this kite kids can still have fun. Just encourage the child to run around towing the kite.
It's a good idea to get the diamond in the air yourself first, with the child holding the winder. Then the child can just start running.
Wind-Speed Handy Reference
Light Air
1-5 kph
1-3 mph
1-3 knts
Beaufort 1
Light breeze
6–11 kph
4–7 mph
4–6 knts
Beaufort 2
Gentle ...
12–19 kph
8–12 mph
7–10 knts
Beaufort 3
Moderate ...
20–28 kph
13–18 mph
11–16 knts
Beaufort 4
Fresh ...
29–38 kph
19–24 mph
17–21 knts
Beaufort 5
Strong ...
39–49 kph
25–31 mph
22–27 knts
Beaufort 6
High Wind
50-61 kph
32-38 mph
28-33 knts
Beaufort 7
Gale
62-74 kph
39-46 mph
34-40 knts
Beaufort 8
Stories From Other Visitors
Click below to see Tiny Tots Diamond Kite stories submitted by other visitors to this page...
Impressive Little Flyer
I was just looking on this page this morning to see how to tie knots for a couple of cheap kites I got from the pound shop a few days ago.
Then I noticed …
Super Easy Kites and Great Party Fun!
I made 18 of these easy kites for my twins 2nd birthday party, which we held in a park. The kids (& adults) had such a wonderful time. It was a great way …
Our Plastic Bag Kite
We made your 'kite for kids' today out of a plastic bag.
Attached is a photo of my 6 year old flying it. He has never flown a kite before.
Great …
Never Too Young for Kids Kites!
Love your newsletter, and love the focus on kids kites - that's really what it's all about, isn't it? I had a mom bring her 3 week old to a library workshop, …
Diamond Kite — Other Happy Builders
To be honest I had never before last week had ever made a kite by myself. Even when I was a kid I used to find it hard to make one for myself.
So when …
Fantastic Kite Design for Kids
I highly recommend the MBK Tiny Tots Diamond kite plan. I have almost no kite flying experience, but the instructions are simple and easy to follow. We …
Another Kite for Kids
Here's an old page featuring instructions on how to make a kite for kids that is quite similar to the MBK Tiny Tots design. There was really no need for all those extra strips of tape, though!
Pop in there and see another pic of our Aren, barely old enough to run, obediently hanging on to the string of his tiny homemade diamond. We made it for him of course. There was just enough breeze on that day to keep the kite flying.
You Might Like These
Knot Tying Instructions - All The Kiting Knots Used For MBK Designs
These knot tying instructions cover every knot used in making the whole range of MBK designs.
Kite Plans For The MBK Series Of Kites.
Kite plans, as opposed to step-by-step instructions, are handy for experienced kite builders. Here's plans for dowel / bamboo sparred kites with plastic sails.
How To Make Soft Kites - Easily And Very Cheaply!
Learn how to make soft kites, from nothing more than plastic bags and packing tape. Only sound and well-tested designs here. All is explained, step by step with large photos.
How To Make Paper Kites - Even The 'Sticks' Are Just Paper & Tape!
Learn how to make paper kites, from just A4 or Letter copier paper and sticky tape. Explained step by step with close-up photos. Only sound and well-tested designs here.
How To Make Indoor Kites - Just Paper, Tape and Plastic Sheet!
Learn how to make indoor kites, from just A4 or Letter 80gsm paper, sticky tape and plastic sheet. Step by step with photos. Well-tested designs.
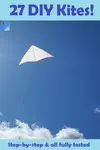
How To Make A Kite - 27 Kites! Illustrated Step-By-Step Instructions
Learn how to make a kite, 8 types to choose from, each in 3 sizes! Plus 3 Box kites. Full step-by-step instructions.
How To Build Kites - 3 Extremely Simple Kites For Adults Or Big Kids!
If you want to know how to build kites, you are at the right place. These 3 simple kites are super quick and easy, yet fly really well.


