- Home Page
- Indoor Kites
How to Make Indoor Kites
Paper, Tape, and Plastic—That's All!
If you want to know how to make indoor kites, my methods are a great way to start. That's because the materials are very close to hand—not to mention dirt cheap. :-)
 MBK Indoor Diamond
On top of that, these designs are quite quick to make, and there is no gluing or knot tying involved. Yippee!
But, you reply, don't special light-wind kites require equally special space-age materials? And could an ordinary person make one?
The truth is, it all boils down to weight. It turns out that copier paper, sticky tape, and thin plastic sheet can indeed be coaxed into the air at very low speeds!
It was a design challenge for sure, but the success of the Indoor Diamond proved the concept.
Getting philosophical now...
There is something special about flying zero-wind kites. You're experiencing flight from a close perspective. It's silent, gravity defying, and equal measures art and science. And it only takes an hour or two to get in on the ground floor with this branch of kiting. You can do that when learning how to make indoor kites the MBK way!
How to Make Indoor Kites...
In the MBK Indoor Series
Just like my Paper Series kites, each kite in this Indoor Series had to prove itself before the how-to instructions were published.
Each design had to:
- achieve at least a 45-degree line angle on 3 meters (10 feet) of polyester sewing thread
- stay airborne for at least three laps while being towed in a circle of 1.5-meter (5-foot) radius, on a 1-meter (3-foot) line
- remain airworthy at a maximum towing speed of 6 kph
Point 1 ensures that you end up with a satisfyingly good flyer. :-) That is, just as good as the Paper Series kites except at a small fraction of the wind speed!
Point 2 ensures that even if you live in a small apartment, you can still build and test my indoor kites. Of course, you would eventually want to take your kite outside—on a dead-calm day. See how high you can fly it as you go for a leisurely walk.
Point 3 prevented me from designing something so fragile that it keeps folding up during your careful attempts to get it airborne. :-|
Got some copier paper at home? Light plastic bags? Some sticky tape? Hopefully, you have a reel of polyester sewing thread as well. You're ready to learn how to make indoor kites and fly one soon!
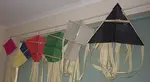
Each section below is dedicated to one of the eight indoor-kite designs. The static photos show my standardized graphic line-art on each design. Permanent color markers are the way to go. If you are a genuine artist, feel free to show me up badly. ;-) But keep it light in weight.
After an estimate of construction time, there follows some brief comments on the design. Finally, a link leads you to the free online instructions for the kite.
Enjoy learning how to make indoor kites.
Indoor Sled Kite
 MBK Indoor Sled
Construction time: about 1 hour and 5 minutes, excluding decoration.
This is the very simplest design in the series, and yet it will put up with somewhat more towing speed than the diamond, thanks to the side flaps. Like some classic sled designs from the mid-20th century, the spars are angled out a little to enhance stability and performance. This kite will stay in the air at just over 3 kph with a sail made from large freezer bags.
Here are free online instructions for making the MBK Indoor Sled kite.
Indoor Diamond Kite
 MBK Indoor Diamond
Construction time: about 1 hour 20 minutes, excluding decoration.
At very low speeds, it's much easier to make a kite stable. With just a tiny amount of dihedral and a horizontal-spar crossing point not far from the standard 25 percent, this kite flies like a classic tailless Eddy. A little bit of sail flutter will be heard if you tow it too fast—best to slow down then!
Here are free online instructions for making the MBK Indoor Diamond kite.
Indoor Rokkaku Kite
 MBK Indoor Rokkaku
Construction time: about 1 hour 40 minutes, excluding decoration.
This little rok has quite similar proportions to the traditional rokkaku fighting kite. Don't try fighting with this one, though! The construction process is a step up from the indoor diamond, with a non-linear vertical spar and an extra set of horizontal spars. In return, this kite is somewhat more efficient than the diamond. Amaze your friends in a large indoor space. :-)
Here are free online instructions for making the MBK Indoor Rokkaku kite.
Indoor Delta Kite
 MBK Indoor Delta
Construction time: about 1 hour 30 minutes, excluding decoration.
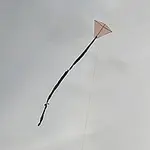
This little delta achieves similar high line-angles as its much larger outdoor cousins. Have fun seeing how it cruises around the house, following your every change in direction.
The kite has quite a narrow "sweet spot" in terms of towing speed but nothing that a bit of practice won't fix :-)
Here are free online instructions for making the MBK Indoor Delta kite.
Indoor Canard Kite
 MBK Indoor Canard
Construction time: about 2 hours 10 minutes, excluding decoration.
This less-known design nevertheless is just as stable and efficient as a delta. It's a little trickier to make than the delta, but this kite certainly rewards you with great indoor flying!
This featherweight kite is possibly the slowest indoor flyer made to date. I tried to weigh it the other day on kitchen scales, where each division on the scale equals 10 grams. Wouldn't you know it—this kite wouldn't even shift the pointer!
Here are free online instructions for making the MBK Indoor Canard kite.
Indoor A-Frame Kite
 MBK Indoor A-Frame
Construction time: about 1 hour 10 minutes, excluding decoration.
This kite is another less-known design but is quite a quick build compared to some of the others in this series. Both the sail and the frame are straightforward. If forming the narrow tips don't bother you, that is! Hopefully, you've made one or two of the earlier designs and have got in some practice with the paper folding involved.
The canard was a slow flyer and so is this A-frame—impressively so! Try setting a duration record for keeping the kite off the floor (and the ceiling) from one end of your house to the other. Just be careful negotiating those doorways. :-)
Here are free online instructions for making the MBK Indoor A-Frame kite.
Indoor Bird Kite
 MBK Indoor Bird
Construction time: about 1 hour 40 minutes, excluding decoration.
They say deltas look birdlike. And indeed, you can see the similarities in construction between bird kites and deltas. This little indoor bird is no exception; see how it has a spine, two leading edges, and a spreader, just like the delta. The addition of a swallow tail and a stylized head-shape complete the impression of a flying bird.
This bird has a slightly higher towing speed than the other indoor designs but is still a fine performer on thread. Go make it peck at some ceilings!
Here are free online instructions for making the MBK Indoor Bird kite.
Indoor Genki Kite
 MBK Indoor Genki
Construction time: about 1 hour 20 minutes, excluding decoration.
This design is what some call a "flying wing." So it's just a wing with no nose, tail, or anything else in between. The full-size kites in this style are very efficient indeed. I can remember a friend of mine flying a large Genki on very thick and heavy line, just to stop it from overflying in the light coastal conditions!
The Indoor Genki climbs up smooth and stable but is a little trickier to get around corners than the canard or delta. It flies steeply on polyester thread. As far as I can tell so far, this kite flies steeper than the delta and the canard. That's saying something! Once up, you can walk this kite along slowly or at a brisk pace since it doesn't strain away at low line angles.
Here are free online instructions for making the MBK Indoor Genki kite.
Wind-Speed Handy Reference
Light Air
1-5 kph
1-3 mph
1-3 knts
Beaufort 1
Light breeze
6–11 kph
4–7 mph
4–6 knts
Beaufort 2
Gentle ...
12–19 kph
8–12 mph
7–10 knts
Beaufort 3
Moderate ...
20–28 kph
13–18 mph
11–16 knts
Beaufort 4
Fresh ...
29–38 kph
19–24 mph
17–21 knts
Beaufort 5
Strong ...
39–49 kph
25–31 mph
22–27 knts
Beaufort 6
High Wind
50-61 kph
32-38 mph
28-33 knts
Beaufort 7
Gale
62-74 kph
39-46 mph
34-40 knts
Beaufort 8
Tips for Taping
This first tip applies specifically to using squares or short strips of tape to secure spars and battens to the plastic sails:
Accuracy is important. So it is infuriating to discover something shifted after applying the tape! Sometimes it's almost impossible to remove the tape and try again.
So here's how you do it, with minimal risk, after ripping off a piece of tape from the dispenser:
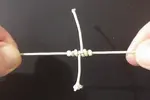
- Holding the tape by one corner, touch one edge of the tape to the plastic.
- With your other hand, dab the tape down just enough to grip the plastic—right near the edge of the tape. Keep your finger on it.
- Remove your grip on the corner and let the tape flop over the part to be taped down.
- Gently dab all over the tape, adhering it to the paper and/or plastic underneath.
This will save a trip to the wig-maker I guarantee. ;-) (No tearing your hair out.)
This second tip relates to when you laminate the spar shapes, printed on paper, with long strips of tape:
After pulling off the required length of tape from the dispenser, wait at least 30 seconds to allow the tape to recover from the stretch.
I like to hold the tape at both ends, right over but not touching the paper. Try to hold as little tension as possible. Then one end can go down, followed by the other end. Finally, using a fingertip, smooth the tape against the paper from one end to the other.
High Flights!
That's high by indoor-flying standards of course. It has proven difficult to find a convenient space that has high ceilings and unfettered access. So I'll possibly end up hiring a hall for one big photo and video session involving all the designs, one day.
In the meantime, enjoy these reports of some occasions when I did manage to fly beyond the constraints of a small three-bedroom house:
- In this flight report, read how the Indoor Sled did several laps of an indoor circuit. That was before venturing outside to tackle a light breeze coming over the side-lawn fence!
- In this flight report, read how I had a less-than-relaxed flight with the newly created Indoor Diamond. There was a surprise waiting as I entered the part of the building that had a high ceiling.
More about Indoor Kites
Using my instructions on how to make indoor kites should be fun for any age group from mid-teens and up.
The designs are cheap enough to allow anyone to experience flying kites indoors or in zero wind.
These are not your average tough retail kites, though. A small child would destroy one of these gossamer wonders in a flash. 8-| Even an adult might accidentally overstress one of these designs while flying or while handling it. Fortunately, it's easy to pinch a failed spar back into shape and hence restore the kite to a flying state quite easily. :-) I also supply tips on how to do a simple repair to restore a failed vertical spar without adding much weight.
Artistic types could make an absolutely stunning piece of flying art, since the material is clear plastic. It's most convenient to do the art just before the sail shape is cut out.
Here's a video of one of my designs in flight—around a small living room! Can you guess which design it is?
You Might Like These
Knot Tying Instructions - All The Kiting Knots Used For MBK Designs
These knot tying instructions cover every knot used in making the whole range of MBK designs.
Kite Plans For The MBK Series Of Kites.
Kite plans, as opposed to step-by-step instructions, are handy for experienced kite builders. Here's plans for dowel / bamboo sparred kites with plastic sails.
How To Make Soft Kites - Easily And Very Cheaply!
Learn how to make soft kites, from nothing more than plastic bags and packing tape. Only sound and well-tested designs here. All is explained, step by step with large photos.
How To Make Paper Kites - Even The 'Sticks' Are Just Paper & Tape!
Learn how to make paper kites, from just A4 or Letter copier paper and sticky tape. Explained step by step with close-up photos. Only sound and well-tested designs here.
How To Make A Kite - 27 Kites! Illustrated Step-By-Step Instructions
Learn how to make a kite, 8 types to choose from, each in 3 sizes! Plus 3 Box kites. Full step-by-step instructions.
How To Build Kites - 3 Extremely Simple Kites For Adults Or Big Kids!
If you want to know how to build kites, you are at the right place. These 3 simple kites are super quick and easy, yet fly really well.
Make A Kite For Kids - The MBK Tiny Tots Diamond
This MBK kite for kids is about as simple as a Diamond can get! Do you have some bamboo BBQ skewers, tape and some plastic bags?