- Home Page
- Indoor Kites
- ... Sled Kite
How to Make an Indoor Sled Kite
On this page are a number of easy steps showing you how to make an indoor sled kite from readily available materials.
 MBK Indoor Sled
The only materials required for this design are:
- One sheet of plain copier paper—A4 or Letter size. Use colored paper if you want to!
- 18 mm (3/4 in.) clear sticking tape, preferably in a dispenser. Narrower tape would be even better if you have it.
- A light plastic bag, at least 45 cm x 30 cm (18 in. x 12 in.) before being cut open. I used large freezer bags.
- Any polyester sewing thread, preferably the lightest available.
The tools required, if you can call them that, are:
- A pair of scissors.
- A ruler.
- A straight edge longer than 45 cm (18 in.).
- A ballpoint pen.
- Colored permanent markers.
Note: In the photos below, yellow lines have been added to make clear where the edges of sticking tape are.

On this site, there's more kite-making info than you can poke a stick at. :-)
Want to know the most convenient way of using it all?
The Big MBK E-book Bundle is a collection of downloads—printable PDF files which provide step-by-step instructions for many kites large and small.
That's every kite in every MBK series.
Step 1—Make Sail
 Measured and dots marked
- Lay down a plastic bag, and smooth it out to remove the most obvious folds and creases.
- Measure and mark dots as indicated in the photo.
 Bag flipped and dots traced
- Flip the bag over.
- Mark dots over the ones showing through the plastic. See to the left in the photo above.
 Bag cut and opened out
- Cut the bag along the sealed edge to open it.
- Cut the bag along the opposite side to the side with four dots.
- Open the bag out into a single flat sheet, with the dots on top. In the photo you can see all ten dots.
 All lines drawn
- Rule lines between the dots as shown to complete the sled shape. Be careful to go through the correct dot at top center!
Step 2—Decorate Sail
Do you have permanent colored markers? It's time to take them out.
 Decorated with permanent markers
- My approach was to put 1 cm (3/8 in.) wide colored stripes down each side of the centerline, 0.6 cm (1/4 in.) apart, followed by a 0.6 cm (1/4 in.) wide border of black all around on the inside of the sled outline. See the photo.
- You do whatever you like! Just try not to add too much weight, though. Doing "sparing line art" is how to make an indoor sled kite look good and minimize weight.
 Sled shape cut out
- Cut all around the sled shape with scissors. Cutting thin plastic can be tricky, so take your time. Sharp scissors help!
- From here on, we will refer to the plastic piece as the sail.
Step 3—Make Spars
Measure and Draw
 Dots measured and marked
- Take your sheet of paper and mark dots as shown.
 Lines drawn
- With ruler and pen, connect the dots as shown.
Laminate and Cut Out
 Tape laid down over shapes
- Lay down sticking tape to fully cover the shapes. A small amount of overlap is OK if your tape is narrower than shown above.
 Tape laid down over shapes, reverse side
- Flip the paper over so you can add tape to the reverse side of all the shapes. It might help to place the paper up against a well-lit window to trace the corners. Another way is to poke holes through the paper with a pin at all the corners. Then you can see where all the shapes are.
 Spar pieces cut out
- Cut out all the shapes as shown.
Join Rectangles
 Rectangles joined, long to short
- Lay down the rectangles end to end, in long/short pairs as shown.
- Check the alignment with a straight edge such as a ruler.
- Tape the pieces together at the join. Use just enough tape to go once around the entire join.
Fold Lengthwise
 Spars folded
- Fold the two rectangles in half down their lengths as shown.
- Crease the folds sharply. Pinching between thumb and forefinger gets the fold started. Then you can sharpen the fold by using your thumbnail as well.
- What you have now is a pair of main spars.
At this point, you're about halfway through learning how to make an indoor sled kite!
Step 4—Attach Spars
Tape a Main Spar
 One main spar in position
- Flip the sail so the art work is against the table.
- Take one main spar, and align one end to the top corner of the sail. Make sure the join in the spar is closest to the bottom end of the sail. Also ensure the fold angle is 90 degrees or a little less.
 Spar taped on at nose end
- At the top corner of the sail, place a short strip of sticking tape across the fold line of the spar.
- Gently press down on both sides so the tape goes down then across to the left and right.
- With scissors trim the overhanging tape flush with the sail edges. See the photo.
 Spar taped on at middle and tail end
- At the bottom corner of the sail, lay down and trim a strip of tape in the same way as before.
- Also place a 2 cm (3/4 in.) strip of tape over the spar at the midpoint. See the photo.
 Both main spars taped on
- In a similar way, lay down the other main spar, ensuring the fold angles are 90 degrees or a little less.
- Apply sticking tape at the top, middle, and bottom just like you did for the first main spar. See the photo.
Step 5—Attach Flying Line
You have pretty much finished learning how to make an indoor sled kite at this point!
 Thread laid down and taped at one corner
- Cut off about 120 cm (47 in.) of polyester sewing thread, and lay at least 5 cm (2 in.) over a side corner of the sail.
- Stick down a 5 cm (2 in.) length of tape over the thread as shown in the photo. Fold the overhanging corners of the tape around the sail edges.
 Thread attached at both corners
- Do the same at the other side corner, with the free end of the thread.
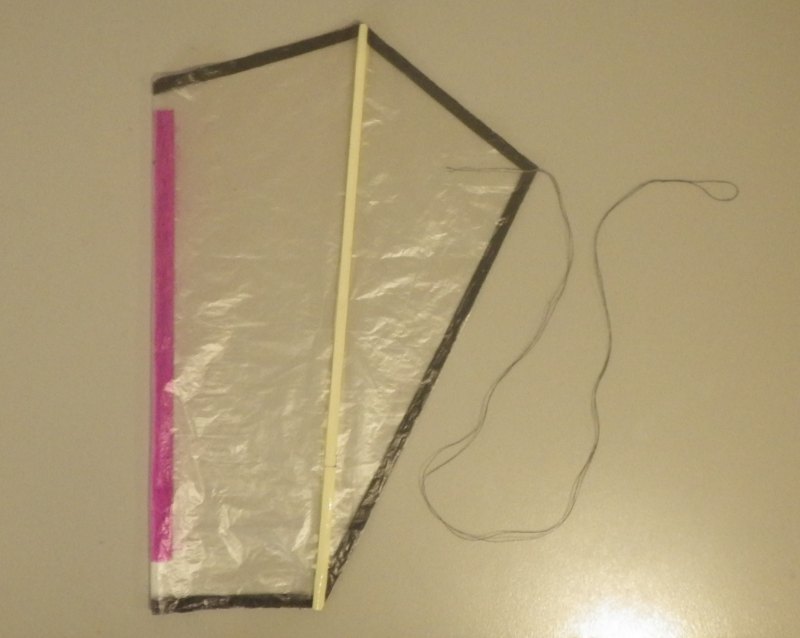
- Tie a Loop knot into the center of the bridle line. By aligning the side corners of the sail together, you can be sure of finding the middle of the thread. See the photo, where the Loop knot is to the right.
Step 6—Flying!
 Indoor Sled floats up
This is a very low-speed kite, and it will effortlessly float up at walking pace. Be careful not to jerk the thread or pull too quickly, since this will promptly fold up at least one of the spars!
If a spar does fold up, don't despair. Just carefully pinch the paper where it failed, to get it back into that V-shape section once again. Then try again, going a little slower or smoother this time.
The Launch Technique
This is how I like to launch on a length of thread equal to your shoulder height:
- Lay the kite flat on the floor, with the thread on top, of course, and the tail end pointing at your feet.
- Lift gently straight up while taking a couple of quick steps backward.
- If the kite appears to be rising, turn around and walk forward while looking back over your shoulder.
- Within seconds, you should see the kite floating behind. Walk a little faster to climb the kite; slow down to descend. It's a fine balance!
If you have the space, try letting out more thread and adjusting your speed until the kite cruises along just short of the ceiling. Look out for light fittings and so on. Look where you're going too from time to time. ;-)
If you need even more line length, just tie on more thread, and wind it onto a small square of cardboard.
I hope you have enjoyed learning how to make an indoor sled kite this way.
As mentioned earlier, there's more kite making on this site than you can poke a stick at. :-)
Want to know the most convenient way of using it all?
The Big MBK E-book Bundle is a collection of downloads—printable PDF files which provide step-by-step instructions for many kites large and small.
That's every kite in every MBK series.
