- Home Page
- Better Kites
- ... Sode Kite
How to Build a Sode Kite
Step by Step—Page 2 of 3
The MBK 2-Skewer Sode
How to Build a Sode Kite
Making Spars
For this sode, you need nine 30 cm (12 in.) bamboo BBQ skewers. Also, you need to cut off six short 0.15 SL (4.4 cm, 1 3/4 in.) lengths of skewer. The photos show how these are all glued together.


Two pairs of skewers have the pointed ends raised up off the table, forming the upper and lower horizontal spars.
The remaining skewers are just lined up straight, flat against the table top. This is the vertical spar. To make sure there is no kink at the joins, get your head down low, and look along the skewers. Do a little shifting, if necessary, before the glue dries!
How to Build a Sode Kite
Attaching Spars

- Snip off the point from the glued group of four skewers.
- Line this end up with the top corner of the kite sail, with the skewers resting along the fold line of the plastic.
- Attach the bamboo to the plastic with insulation tape as in the photo.
- At the bottom edge of the sail, snip the side-by-side skewers to length. You can let them overhang by a few mm (1/4 in.), since this join will be glued shortly.

- Now lay down the other pairs of skewers across the left and right corners of the sail so the middle joins sit on the vertical spar.
- Snip off the points of the skewers so the tips line up with the left and right corners of the sail. Take your time, since you don't want to snip off too much bamboo.
- Tape the tips to the sail corners. These are the horizontal spars.
- Finally,
use a few drops of glue to attach the skewers together at the points where they cross each other. I used a few extra bits of tape to temporarily keep the joins in place until the glue dried. The photo shows the kite at this point.
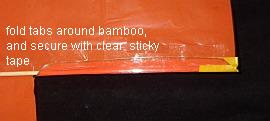
All glued and dried? Now all the tabs need to be folded and secured with clear sticky tape.
Up there is a closeup photo showing one of the tabs.
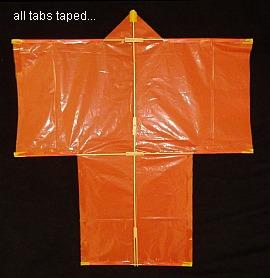
The kite is nearly complete as you can see in the photo.
I was a little more sparing with the tape on the upper horizontal spar tabs to help avoid nose-heaviness.
How to Build a Sode Kite
Bridle
Dacron line in 20- to 50-pound strength is suitable for all the Skewer Series kites.
All the construction details for the bridle are contained in the large photo below. Look and read carefully, and you can't go wrong on this rather important bit!
KNOTS
If you are new to this, you might need instructions on how to tie the following knots:
TIP: Secure the slip knots onto the bamboo of the spars with a tiny blob of wood glue each so they can't loosen.

ADJUSTMENT
Once your kite and bridle looks like the photo up there:
Hold the short bridle line up so all the bridle lines are straight, with the kite laying flat on the table or floor. The Prusik knot nearest the sail should be shifted so it is centered right over the vertical spar.
Referring to the diagram below, shift the higher Prusik knot to the shown position. It's not necessarily the perfect
position for your individual kite, but it should at least fly on the
first attempt! Later, you can experiment with shifting the position slightly, just a little at a time, to improve how high your kite flies.

Cut out a long rectangular piece of dark plastic for the tail. Black garbage-bag plastic contrasts well with the orange sail. Make it about 0.3 SL (8.7 cm, 3 1/2 in.) wide and 6.0 SL (174 cm, 69 in.) long.
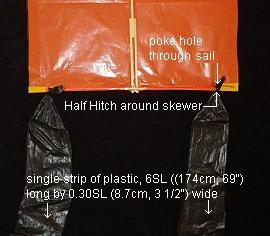
As you can see in the photo, the ends of the tail are knotted near the tips of the bottom horizontal spar.
You will need to poke holes in the sail plastic and then attach each end with a simple Half Hitch.
At this point, you've finished making the 2-Skewer Sode!

To attach the flying line, just Lark's Head the flying line to the short bridle line as in the photo.

As mentioned earlier, there's more kite making on this site than you can poke a stick at. :-)
Want to know the most convenient way of using it all?
The Big MBK E-book Bundle is a collection of downloads—printable PDF files which provide step-by-step instructions for many kites large and small.
That's every kite in every MBK series.
