- Home Page
- Soft Kites
- ... Octopus Kite
How to Make an Octopus Kite
Step by Step—Page 5 of 5
The MBK Octopus
Required Mods
The Air Intake
Earlier, you
were shown how to extend the tails so the octopus kite would fly
stable. To make the air intake more robust, it is also necessary to
cut back the upper edge.
 Bridle lines knotted and cut to length
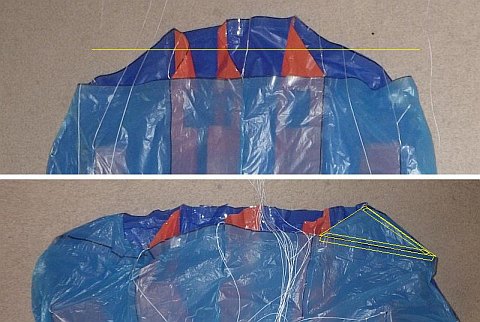
- Cut straight across the upper surface plastic, taking off any rib plastic that gets in the way. Then trim the ribs back to straight edges again. See the top photo, where the yellow line gives a rough indication of the initial cut. The upper surface should extend only half as far forward of the lower surface as it did before.
- The cut produces a new corner in the upper surface plastic on the left and right. Fit and tape a triangular piece of plastic as indicated in the bottom photo. Fit one on the left and one on the right. One corner of the triangle goes to near the bridle attachment point on the nearest (orange) rib.
Note: Don't forget to add tape to the new air intake as described in the sections Reinforcing Air Intake—Sides and Reinforcing Air Intake—Ribs.
An Extra Attachment Point
Take a moment
to review the section Creating A-lines Attachment
Points. That is, how
you created the bridle attachment loops and anchored them to the
ribs. An extra
one is required, as indicated in yellow
in the photo below.
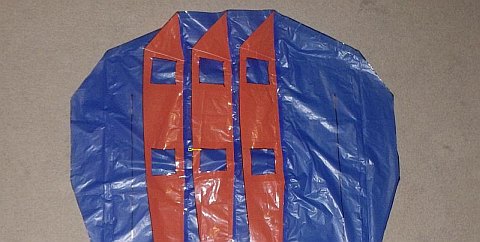 Where to add the extra bridle attachment point
Of course, at this point the lower surface plastic is in the way! The photo up there is from an earlier stage of the kite's construction.
So:
You will need to make a small slit, on each side of the central rib, in the lower surface plastic to get the line through. A cell or two might have to be partially turned inside out so you can get at the required bit of the central rib to tape the line in place.
Note that to make things easier, the line doesn't go the whole height of the rib. Instead, wrap it around near the corner of the square vent as shown.
The Bridle
Making Bridle Lines
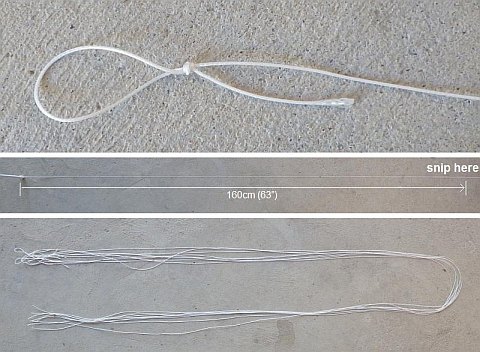 Bridle lines knotted and cut to length
- Take some Dacron flying line, and tie a Simple Loop knot into the free end as in the top photo.
- Anchor the loop to something fairly narrow, and cut off the line at 160 cm (63 in.) as illustrated in the middle photo.
- Now make another nine bridle lines to the same length. Anchor the lines one by one with the first line so you can conveniently snip off a new one at the right length.
- All the lines are shown in the bottom photo.
Attaching Bridle Lines
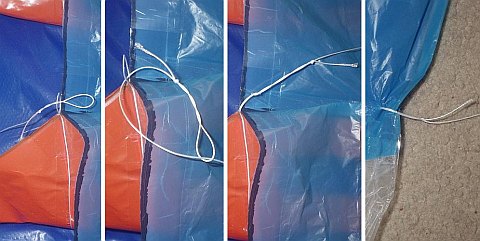 Steps to attach a bridle line
- Take one of the lines already prepared. Push the looped end through one of the attachment point loops nearest the leading edge of the Head. See the first photo, above. Yes, it's the old air intake in the photo—ignore that!
- Pass the other end of the line through the loop as in the second photo.
- Pull tight, as in the third photo.
- Repeat these steps, attaching a line to every attachment loop on the lower surface of the kite.
- You should have two lines remaining. Poke a hole through a bottom corner of the head, just missing all the sticking tape, and attach a line. See the fourth photo, which shows part of one of the outer tails. Do the same at the other corner, using your last bridle line.
Precise Bridle Measurements
After plenty
of flight testing, a particular set of bridle line lengths were found
to be ideal.
Be careful to
measure right to the base of each bridle attachment loop—that is,
where it leaves the lower surface plastic sheet.
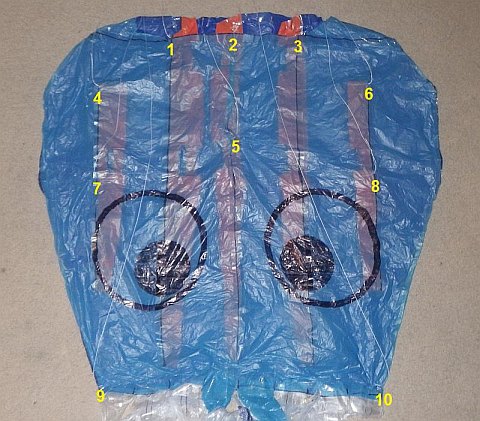 Attachment point locations
For each number below, attach a bridle line to the matching location on the kite, then measure and make a mark at the indicated length.
Attach, measure, and mark one bridle line at a time:
- 118 cm (46 1/2 in.)
- 115 cm (45 1/4 in.)
- 118 cm (46 1/2 in.)
- 128 cm (50 1/2 in.)
- 121 cm (47 1/2 in.)
- 128 cm (50 1/2 in.)
- 136 cm (53 1/2 in.)
- 136 cm (53 1/2 in.)
- 140 cm (55 in.)
- 140 cm (55 in.)
Like to see a video clip? Just scroll down to near the end of this page.
All done? Now:
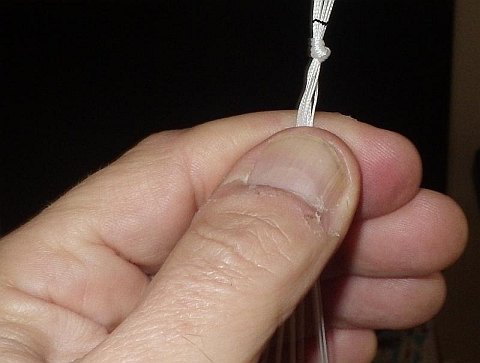 Measured bridle lines tied with a Multi-Strand Simple knot
- Gather all the lines together.
- Line up all the marks so they are sitting together in one spot—just above the knot in the photo.
- Trim the lines with a single snip with scissors a short distance above the marks, say 2 cm (1 in.).
- Tie all the lines together with a Multi-Strand Simple knot, taking care that all the marks still line up with each other.
Note:
It doesn't matter whether the marks are slightly in front, behind, or right inside the knot—as long as they are all together.
Tying Short Bridle Line
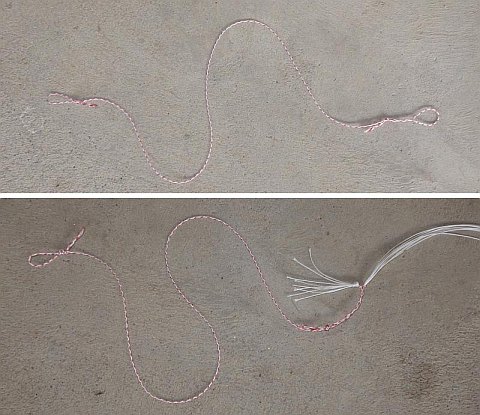 The short bridle line, tied and attached
- Cut off a piece of flying line, 60 cm (24 in) long.
- Tie a Double Loop knot into both ends. See the top photo above.
- Secure one end behind the towing point knot by forming the loop into a Lark's Head. See the bottom photo up there.
After Kite Completed
Packing the Kite
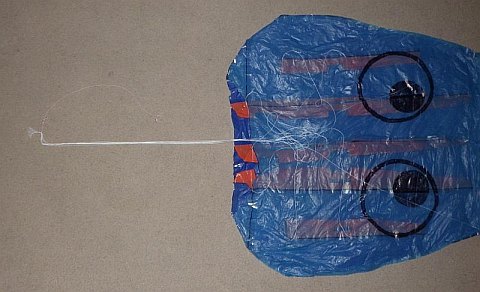 Bridle lines laid out
- Lay the bridle lines out, away from the leading edge, with the lower surface plastic facing up. Let the longer lengths lie loose on the plastic as in the photo.
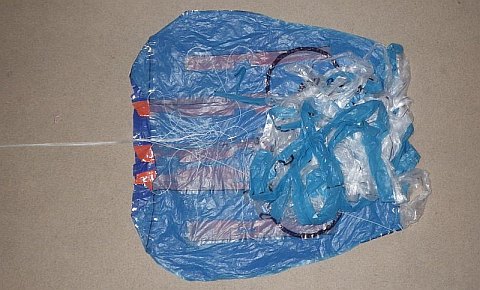 Tails folded onto lower surface
- Fold the tails, about 1/2 head-height at a time, onto the plastic. Grab all eight tails at once, each time. Carefully squeeze the air out as you go, toward the small ends. After a flight, the tubes will still be half inflated!
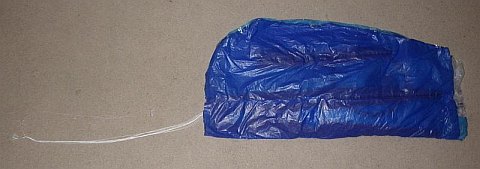 Kite folded down centerline
- Fold the kite in half, down the centerline, and squeeze the air out toward the air intake. The loose lengths of bridle lines and all the tails are held inside.
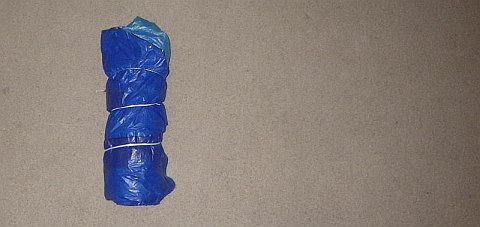 Kite rolled up ready to stow
- Starting from the tail end, roll the head up quite tightly before winding the bridle lines around. It's all ready to stow!
Flying!
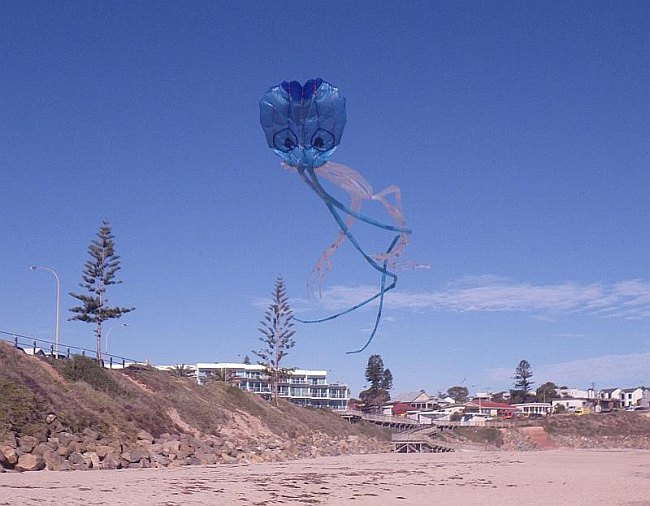 Attach line, inflate, let out line
After unrolling the kite at a flying field, carefully drop the tails out and let them float downwind without fouling on the bridle lines. The tails for this kite are so long that it pays to put a weight on the front of the kite to hold it down while you separate all the tails right down to their tips.
Lark's Head the flying line behind the Double Loop knot of the short bridle line. This makes it easy to attach the flying line and take it off again.
Avoid flying in very windy weather.
If the kite needs it, flying far off to the left and right and even right down to the ground, tie a little Loop knot into both of the bottom bridle lines to pull those corners in a bit more. Be sure to shorten each line the same amount. Further shortening can be done by putting in more knots right next to the Loop knots.
I hope you enjoyed learning how to make my MBK Octopus design!
As mentioned earlier, there's more kite making on this site than you can poke a stick at. :-)
Want to know the most convenient way of using it all?
The Big MBK E-book Bundle is a collection of downloads—printable PDF files which provide step-by-step instructions for many kites large and small.
That's every kite in every MBK series.
