- Home Page
- Soft Kites
- ... Parachute Kite
How to Make a Parachute Kite
Step by Step—Page 2 of 3
The MBK Parachute
Slitting Lower Surface
The lower surface plastic needs slits
through which the ribs' bridle attachment points can be inserted.
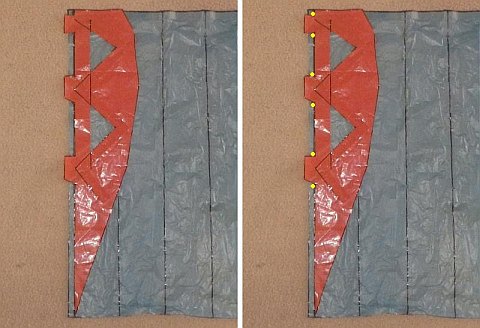 Where to mark dots for slits on lower surface plastic
- First, place a bridled rib along the vertical line drawn onto the lower surface plastic near one tip. See the photo at left, where the rib is aligned.
- Second, mark dots where indicated by the yellow circles in the photo at right. Make the dots a little wider than the line so you can see them, of course!
Note: The dots are slightly further apart than the length of the attachment points. This is OK and allows a little room for error.
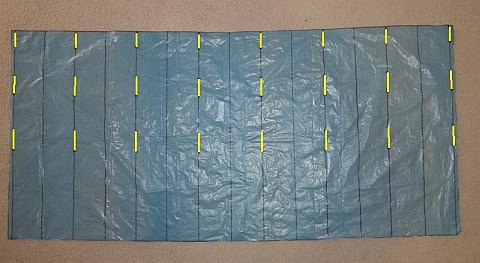 Where to cut slits in lower surface plastic
- Keep shifting the rib to the right, skipping one line, and marking in those six dots each time. Keep going until you have marked dots onto every second vertical line of the whole lower surface plastic.
- Get out your scissors, and make a slit between every pair of dots. To make things clear, I have added a yellow line which represents each slit in the photo above.
Making Bridle Attachment Points
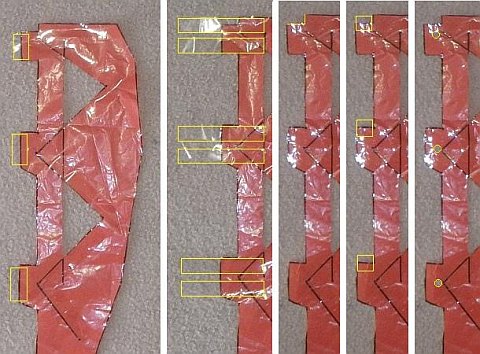 Bridle attachment points on a rib—taped, cut, and poked!
- Place tape where indicated by the yellow rectangles in the first photo. Half the width is not stuck to anything yet.
- In the second photo, the first three tapes have been folded around to stick on the other side of the plastic. The yellow rectangles show where to stick six more tapes—each of them 10 cm (4 in.) long with 5 cm (2 in.) stuck down.
- In the third photo, the second lot of tapes have been folded around to stick on the other side of the plastic. The yellow lines show where to snip away a small section of doubled-up tape.
- In the fourth photo, a square piece of sticking tape has been half stuck to one edge of each bridle attachment point.
- In the fifth photo, the squares of tape have been folded down around the edges. Also, yellow circles indicate where holes have been poked for the bridle lines using a ballpoint pen or something that size.
You know what's coming next; yes, do all the above for every remaining bridled rib!
Assembling the Canopy
Attaching a Bridled Rib
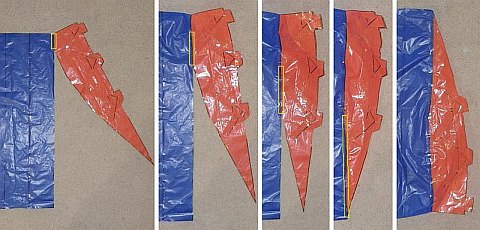 Bridled rib with no vents taped to upper surface plastic
- Lay down the upper surface plastic with the tape edging facing up.
- Referring to the first photo, line up a bridled rib with no vents with the side edge of the upper surface plastic. Run tape the full length of the join as indicated by the yellow rectangle. Trim off any excess tape with scissors.
- Draw the next edge of the rib to the upper surface plastic as in the second photo. Run tape down the join—again, as indicated by the yellow rectangle.
- There are two more rib edges to go. Do these as illustrated in the third and fourth photos.
- In the fifth photo, the upper surface plastic has been flipped over so the other side of the join can be taped. Just apply tape section by section, like it is on the other side.
Attaching an Alternate Rib
You know the drill by now, so no more yellow
rectangles!
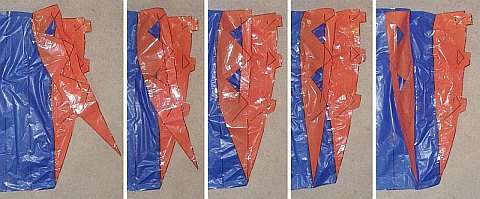 Alternate rib taped to upper surface plastic
- Take an alternate rib, and line up its shortest edge with a black line on the upper surface plastic and tape it in place—as in the first photo. Make sure it's the black line nearest the other rib!
- Move on to the other rib edges one by one, taping them to the upper surface plastic. See the second, third, and fourth photos.
- Now flip the alternate rib over. Flatten it out, and tape the join edge by edge from top to bottom. See the fifth photo.
Attaching Remaining Ribs
Here's the picture: So far, you've done a
bridled rib with no triangular vents on one wingtip of the
upper surface plastic. Next to this tip rib, you have taped an
alternate rib, which has triangular vent holes.
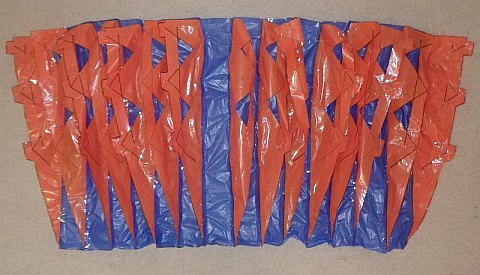 All ribs attached to the upper surface plastic
On the remaining vertical lines, in the
following sequence, you now need to tape in ribs as shown in the
photo above (from right to left) and as listed below:
Bridled rib, alternate rib, bridled rib, alternate rib, bridled rib, alternate rib, bridled rib, alternate rib, bridled rib, alternate rib, bridled rib, alternate rib, bridled rib with no triangular holes.
As a double check, you should end up with an alternate rib down the middle, with seven alternating ribs on either side. A bridled rib with no vents is on each wingtip.
Note: To avoid a silly mistake, it would be a great idea to put the bridled rib with no vents to one side, until all other ribs are taped in!
Attaching Lower Surface—A Bridled Rib
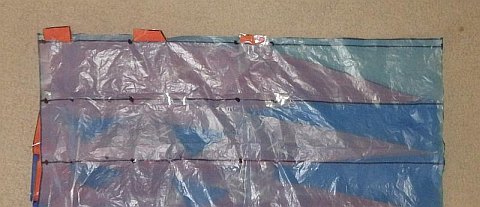 Bridle attachment points poked through lower surface plastic
- Lay down the upper surface plastic (dark blue) and then the lower surface plastic (light blue) as in the photo above.
- Poke the bridle attachment points of one tip rib through the slits.
Note: The taped edge of the lower surface plastic is on the left and facing the floor.
 Bridle attachment points taped in place
- Ensure the attachment points are pulled through fully. The long edges of the orange rib should line up with the straight black line that runs through the slits.
- Place sticking tape where indicated by the yellow rectangles in the photo above.
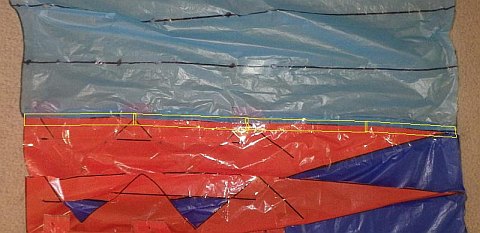 Lower surface plastic taped to tip rib along full length
- Flip the upper surface plastic up, and fold it along the black line—all the way from left to right. There is only a thin strip of light blue plastic under the fold in the photo above.
- Apply strips of sticking tape along the join. You can use more or less pieces than indicated by the yellow rectangles as long as you end up with it all stuck down in a straight line. The plastic in the photo is not sitting perfectly straight, but get yours as straight as possible.
Attaching Lower Surface–An Alternate Rib
 Alternate rib nearest wingtip, taped in place
- Flip the lower surface plastic down again so it is laying flat over the upper surface plastic. Note that black line running from left to right in the lower half of the top photo.
- Fold the lower surface plastic back up, with the previously mentioned black line quite close to the fold. Note the straight edge of the alternate rib lined up next to the black line. See all this in the middle photo.
- Now bring up the edge of the alternate rib to meet the black line. Apply sticking tape all along the junction as indicated by the yellow rectangles in the bottom photo. Another approach is to tack the plastic together with three or four tiny pieces of tape first, before running one piece of tape the full length.
Here's a photo showing what you have accomplished—a cell!
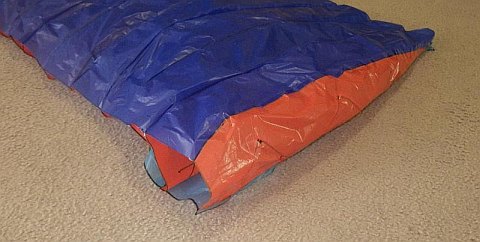 First completed cell, showing airfoil shape and ram-air opening
Attaching Lower Surface to Remaining Ribs
You have seen how to tape in a bridled rib followed by an alternate rib. Now it's time to repeat this over and
over. Work your way across the wing, rib by rib, until you finally
tape in the other (bridled) tip rib.
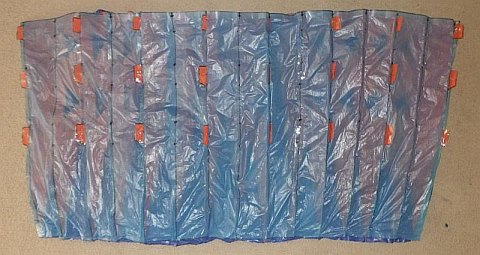 Lower surface of the completed canopy
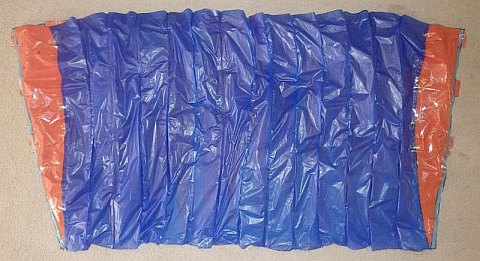 Upper surface of completed canopy, showing both tip ribs
Leading Edge Reinforcements—Wingtip
For this step, you will need to tear off short
strips of sticking tape—about three times longer than they are wide.
 Reinforcement of tip-cell opening
- In the photo on the left, of a wingtip: The yellow lines indicate where to place the middle of each piece of tape before wrapping it around onto the plastic on each side.
- In the photo on the right: Bearing in mind that you can't see all the tape from this angle, the yellow lines indicate where the tape has been stuck.
Note: This step is tedious, but quite important if you intend to get many hours of flying out of your kite!
Leading Edge Reinforcements—The Rest
Having done the reinforcements for one wingtip, you should now be able to complete the job.
Work your way across, taping all the other air
inlets in the same way. Although you can't see the added tape in
the photo below, it shows all the cell openings at the front of the
canopy...
 Cell openings of the canopy
Closing the Trailing Edge
Lay the canopy on the floor with the lower surface
plastic facing up. Stretch out the trailing edge, laying all the ribs
of half the wing over toward the tip. See the photo below:
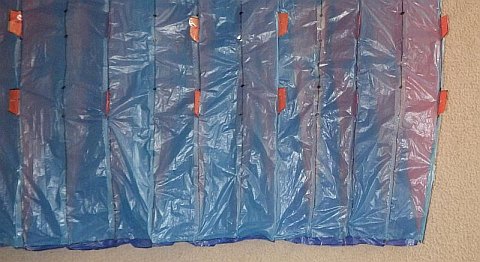 Canopy trailing edge ready for taping from center to tip
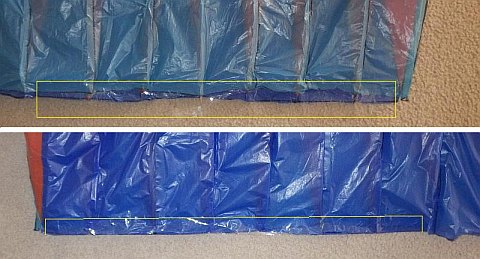 Where to tape the trailing edge
- The top photo shows a length of clear packing tape laid down across the trailing edge, covering seven cells. Leave a small gap between the tape and the central rib. Also, just half the tape is sticking to plastic. Avoid sticking tape to the floor!
- The bottom photo shows the canopy flipped over. See how the tape has been folded around and stuck to the upper surface plastic.
- The photos show half of the trailing edge taped up. Now tape up the other half in the same way.
Note:
Since the rib taping was done front-to-back, it's likely that the
trailing edges of the upper surface and lower surface plastic sheets
do not line up perfectly—like mine up there. Don't fret! If you have
done a reasonable job, the kite will fly fine.
As mentioned earlier, there's more kite making on this site than you can poke a stick at. :-)
Want to know the most convenient way of using it all?
The Big MBK E-book Bundle is a collection of downloads—printable PDF files which provide step-by-step instructions for many kites large and small.
That's every kite in every MBK series.
