- Home Page
- Soft Kites
- ... Parachute Kite
How to Make a Parachute Kite
Step by Step—Page 1 of 3
The MBK Parachute
Learn how to make a parachute kite with these easy-to-follow instructions—fully illustrated with closeup photos every step of the way.
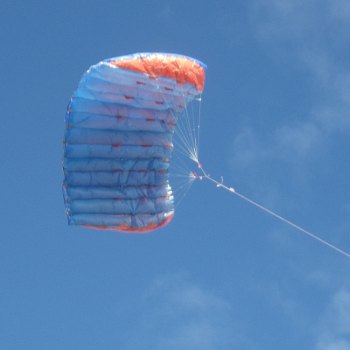 MBK Parachute
These instructions will take you step by step through making a 119 cm (48 in.) wide parachute kite. It's not quite that wide in the air, since the canopy takes on a distinct curved shape when inflated. This 14-cell kite performs best in moderate to fresh wind speeds. That's 20 to 38 kph or 13 to 24 mph. In gentle winds, this kite will hang in the air at fairly low line angles. In fresh winds, it pulls firmly for its size, so small kids should only fly it while supervised!
Some of the lines are longer than the standard 30 cm (12 in.) of most rulers. So a handy trick is to stretch out a length of flying line, weigh it down at each end, and then make several dots beside it—less than a ruler length apart. The dots can then be joined by using your ruler. With care, you will end up with a perfectly straight long ruled line every time.
The MBK Parachute kite is inspired by full-size skydiving parachutes. This tape-and-plastic version is somewhat simplified from the full-size canopy but works in exactly the same way. This parachute has been tested in up to 40 kph winds.
Materials for this kite
The kite described here will do well with just about any fairly robust plastic sheet. For example, heavy-duty painters' drop sheet or drop-cloth plastic. That would be around four mil thickness for those buying plastic sheet in the USA. My kite also used council-bin-liner plastic. This is somewhat thicker and stronger than trash can (rubbish bin) liners.
Ordinary clear sticking tape in a dispenser is good for tacking seams together before laying down more of the same along the full length of the join. I used 1.8 cm (3/4 in.) wide tape.
These instructions illustrate a parachute made with 20-pound Dacron bridle lines. This type of line is readily available from eBay and Amazon online stores.
Upper and Lower Surfaces
When this kite flies, one surface of the sail faces the sky—the upper surface. The other surface is easily visible from the ground—the lower surface. In between the two surfaces are vertical panels called ribs.
Note: I suggest you use at least two different colors for your sail plastic for upper and lower surfaces. I also used a third color for all the ribs to make construction easier to see in the photos. Accordingly, the instructions will refer to upper surface plastic, lower surface plastic, and rib plastic.
On this site, there's more kite-making info than you can poke a stick at. :-)
Want to know the most convenient way of using it all?
The Big MBK E-book Bundle is a collection of downloads—printable PDF files which provide step-by-step instructions for many kites large and small.
That's every kite in every MBK series.
How to Make a Parachute Kite
Making Upper
Surface
Measuring Upper Surface
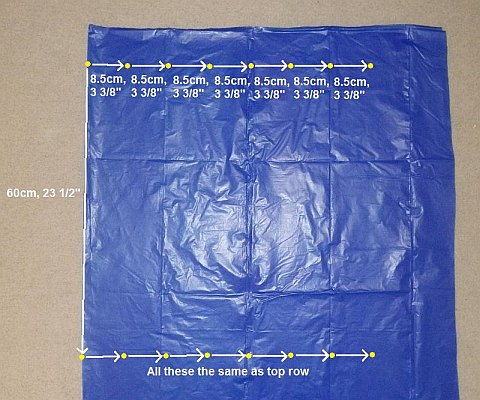 Measured and dots marked
- Place some upper surface plastic on the floor. Fold it in half from left to right, and run a sharp straight crease down the left-hand side.
- Starting from near the top left corner, measure and mark dots on the plastic. Just follow the arrows marked on the photo. Dots have been highlighted in yellow.
Hint: Judge the horizontal directions by eye. If you're careful, there's no need for a T-square, since the sail ends up symmetrical anyway. Note that the vertical direction looks a little off in the photo—the result of image perspective only!
Completing Dots for Upper Surface
Half the dots are already marked, so now you mark in the remaining ones. Almost invisible in the photo below, but they are all there, small and in black:
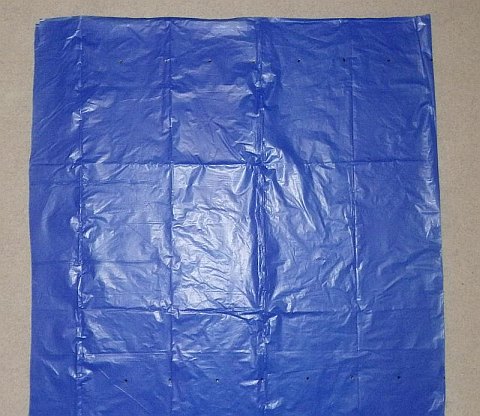 Plastic flipped, dots traced
- Flip all the plastic over. Smooth out the two layers of plastic, double checking that the vertical crease stays in place.
- Make dots over all the dots showing through the two layers of plastic. Keep checking that nothing has slipped!
Hint: If it's too hard to see through the plastic, just lay it up against a sunlit window to mark in the dots.
Drawing Lines for Upper Surface
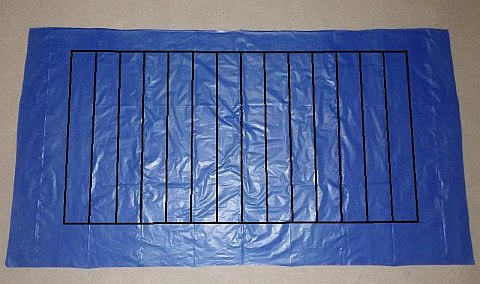 All lines marked
- Open out the sheet of plastic, and lay it flat.
- Connect the dots with marked lines as shown in the photo. The central crease is also drawn over.
Note: The photo has been edited to make the
lines darker and easier to see.
Taping Upper Surface
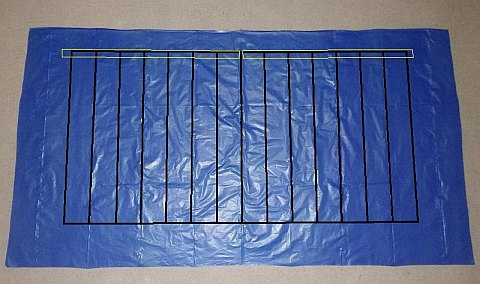 Where to put sticking tape edging
- Lay down 1.8 cm (3/4 in.) sticking tape where indicated by yellow rectangles in the photo above. Note that most of the tape is stuck inside the outline.
Cutting Upper Surface
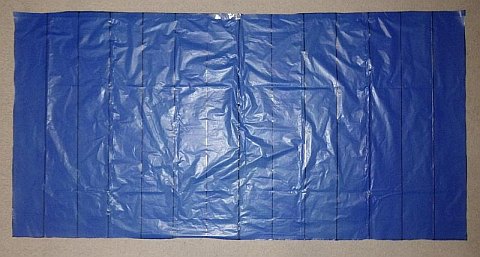 Upper surface sheet cut
- Take your scissors, and cut all around the outside of the shape along the black lines. When you are finished, the plastic should look like the photo up there, with internal guide lines still intact.
Making Lower Surface
This ends up looking very similar to the upper surface. In fact, rather than doing the measuring all over again, it's simpler to start by tracing.
Tracing Lower Surface
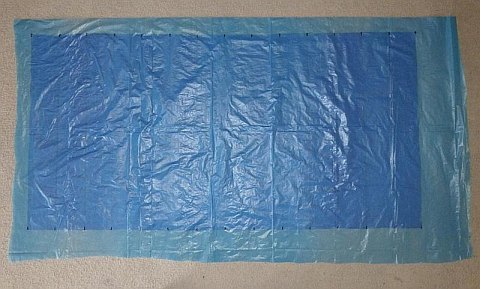 Dots traced onto lower surface plastic
- Lay out the upper surface plastic on the floor with the black lines facing up.
- Lay out enough lower surface plastic to fully cover the upper surface plastic. A fairly light-colored plastic for the lower surface is a good idea so you can see through it!
- Make sure both layers of plastic are lying down smooth and flat.
- With your permanent marker, make dots at all the corners. That's 30 dots in all. See the photo up there, where all the dots are just visible in two rows of 15.
Extra Dots on Lower Surface
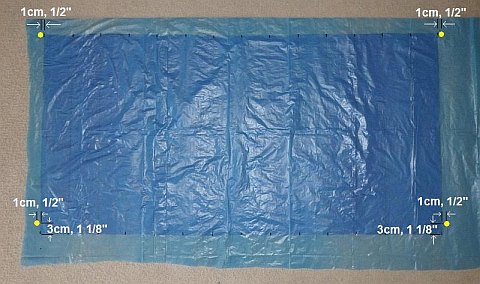 Extra dots marked onto lower surface plastic
- The positions of four extra dots are indicated by the yellow dots in the photo above. Note the measurements from corner dots you have already marked.
- When the four dots are marked in, remove the underlying plastic, leaving just the sheet with the dots on it.
Drawing Lines for Lower Surface
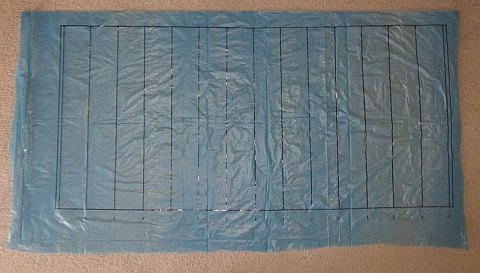 All lines marked
- Connect the dots with marked lines as shown in the photo. Notice how the lower surface shape is 3 cm (1 1/8 in.) shorter than the upper surface shape. The dots at the bottom just show you where to lay the ruler for the vertical lines.
Taping Lower Surface
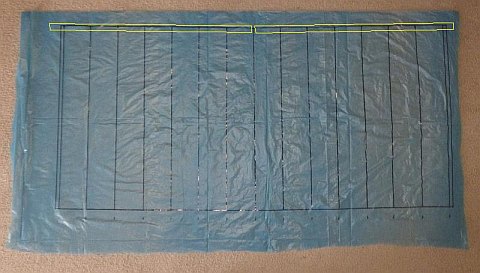 Where to put sticking tape edging
- Lay down 1.8 cm (3/4 in.) sticking tape where indicated by yellow rectangles in the photo above. Note that most of the tape is stuck inside the outline.
Cutting Lower Surface
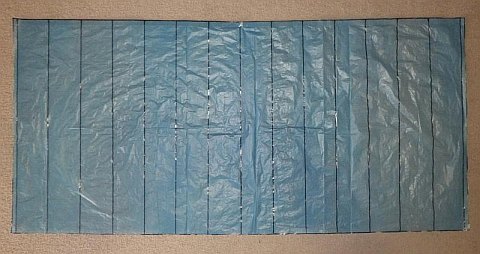 Lower surface sheet cut
- Take your scissors, and cut all around the outside of the shape along the black lines. When you are finished, the plastic should look like the photo up there, with internal guide lines still intact.
Making Ribs
First, a template is measured up in three steps. For
this, use any smooth light-colored surface that you don't mind
marking with a black permanent marker. I used two sheets of plain
copier paper, stuck together with sticking tape on one side only.
Measuring Rib Template Dots
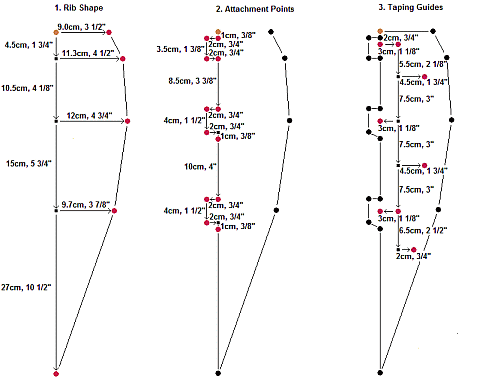 How to mark dots on rib template
- For each step, start from the orange dot, and mark the other dots by following the measurements and arrows.
Note: If there's no room for an arrow, there won't be one! Just go from the orange dot to the nearest red dot in those cases.
Marking Rib Templates
It's probably best to avoid using anything stretchy for this, like very thin plastic! The photos below show my template, made from two sheets of copier paper.
In each photo, you can just spot the join between
the two sheets, running straight across the middle. The sticking tape is
out of sight on the other side.
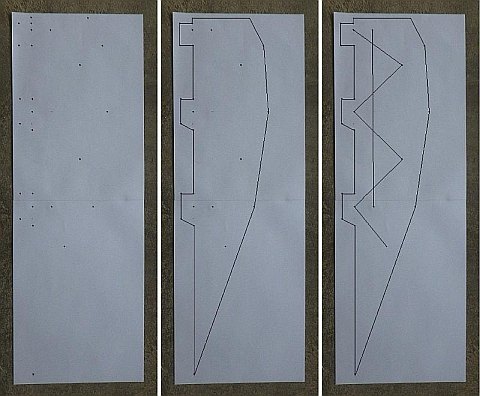 Rib template measured and drawn
- The first photo shows the marked dots of the template.
- The second photo shows the rib outline drawn in, including the bridle attachment points. For accuracy, it's best to use a fairly thin-tipped marker for this. In fact, I used a ballpoint pen on the paper.
- The third photo shows the guide lines drawn in for taping and cutting the triangular vent holes. That's the two largest triangles formed by the lines.
Creating the Bridled Ribs
There are eight bridled ribs, all identical except for two that don't have the triangular vents cut out. Each of these eight ribs have three bridle attachment points—hence the name bridled rib.
The first three images below have the black dots and
lines enhanced so you can see them easier.
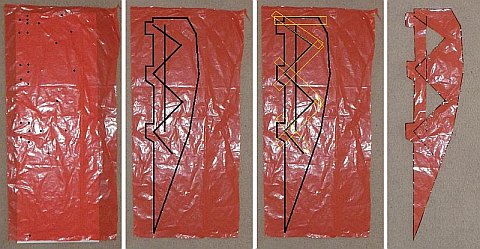 First bridled rib—dots marked, lines drawn, taped, and cut
- Place some rib plastic over the template.
- Make dots at all the corners showing through as in the first photo.
- Draw lines between the dots, exactly as shown in the second photo.
- Apply strips of sticking tape where indicated by the yellow rectangles in the third photo.
- Cut around the rib shape with scissors as in the fourth photo. Also cut out the two triangular vents along the black lines.
- Make five more ribs in exactly the same way.
- Finally, make another two ribs, but don't cut out the triangular holes! That's because these two will be the wingtips of the parachute canopy.
Creating the Alternate Ribs
There are seven identical alternate ribs, which
have no bridle attachment points. In the finished canopy,
there is an alternate rib between every two bridled ribs—hence the
name.
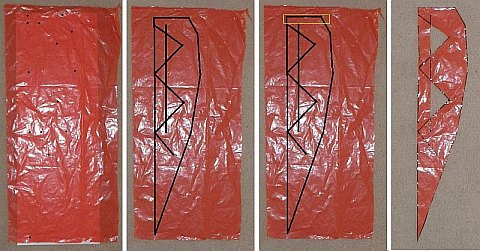 First alternate rib—dots marked, lines drawn, taped, and cut
- Place some rib plastic over the template, and make dots as before, but leave out the bridle attachment points. See the first photo.
- Draw lines between the dots, exactly as shown in the second photo.
- Apply sticking tape where indicated by the yellow rectangle in the third photo.
- Cut around the rib shape and triangular vents with scissors as in the fourth photo.
- Make six more ribs in exactly the same way.
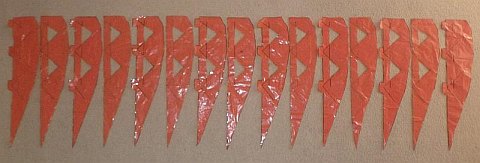 All the ribs of the parachute canopy
As mentioned earlier, there's more kite making on this site than you can poke a stick at. :-)
Want to know the most convenient way of using it all?
The Big MBK E-book Bundle is a collection of downloads—printable PDF files which provide step-by-step instructions for many kites large and small.
That's every kite in every MBK series.
