- Home Page
- Paper Kites
- ... Diamond Kite
How to Make a Paper Diamond Kite
Step by Step—Page 3 of 3
The MBK Paper Diamond
Attaching Bridle Lines
Make Holes
 Where the bridle holes go
- Flip the kite over so the vertical spar is facing up.
- Measure and make marks at the positions shown in the photo.
- Using the corner of a scissor tip, penetrate the tape and paper where the black circles are in the photo.
Attach Upper Line
 Upper line secured with tape
- Measure and snip off a 50 cm (20 in.) length of polyester thread.
- Flip the kite over, and put the thread through the two holes nearest the nose of the kite. Make the length of thread equal from each hole.
- Hold the thread in place with a short strip of tape. The photo shows the back face of the kite, with the tape indicated as a yellow rectangle.
Attach Lower Line
 Lower line secured with tape
- Measure and snip off a 60 cm (24 in.) length of polyester thread.
- As before, put the thread through the two holes, and make the length equal from each hole.
- Hold the thread in place with a short strip of tape—indicated as a yellow rectangle in the photo.
Adjust Bridle Lines
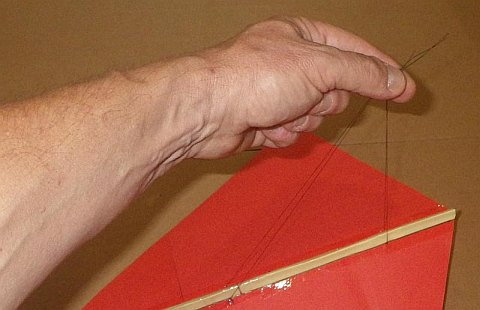 Bridle lines adjusted
- Bring all four pieces of thread together between finger and thumb.
- Suspend the kite off the floor with as little thread as possible coming out the top of your hand.
- Adjust so the upper bridle lines are at right-angles (90 degrees) to the vertical spar when viewed from the side.
- Double check that all lines have pulled straight before tying a Multi-Strand Double knot close to where you gripped them all.
- Trim the free ends to the same length with scissors. See below:
 Free ends trimmed
The Tail
Three Sheets to Start
 Three sheets of paper taped together
- Line up the short edges of three sheets of paper. Tack them together with squares of tape.
- Tape along the joins over the full width of the paper. See the photo.
- Flip the sheets, and tape over the joins again.
Measuring and Marking
 Tail area measured and drawn
- Measure a width of 18 cm (6 3/4 in.) and a length of 80 cm (32 in.), marking dots on the paper.
- With pencil and ruler, mark out the tail area as in the photo.
Note: The paper areas outside the marked lines will look a little different if you are using Letter-size paper. But it's the marked rectangle you will be using!
 Tail streamers marked out
- Across the width of the paper (up/down in the photo) mark dots at intervals of 1 cm (6/16 in.). Repeat at the other end and also in the middle, if necessary, so lines can be drawn the full length of the large rectangle.
- Rule straight lines through the dots. See the photo.
- There should be 18 thin rectangles marked out.
Like to see a video clip? Just scroll down to near the end of this page.
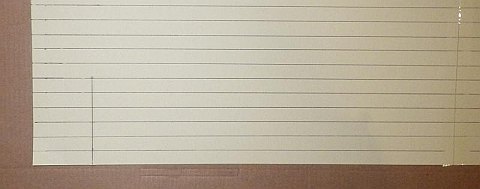 Line drawn across six streamers
- Measure and draw a line across six of the streamers, 4 cm (1 ¾ in.) from the short edge of the paper. It's at far left in the closeup photo.
Cutting
 Tail area cut into three smaller rectangles
- With scissors, cut along two of the lines to create three smaller rectangles as shown. Each rectangle should contain six narrower rectangles.
 Rectangles taped together end to end
- Place the short ends together, and tape on both sides. The short line crossing the six streamers should remain at an untaped end. You can see it at top left in the photo.
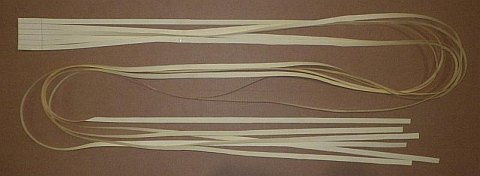 Rectangles cut into streamers—stage 1!
- Now cut the streamers with scissors—all the way up to the line going across. See the photo.
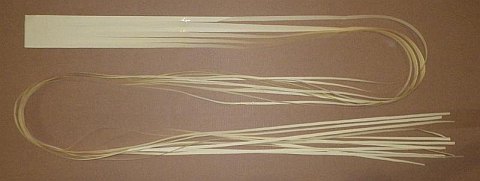 Streamers split into two for 2/3 of the length—stage 2
- Finally, cut the streamers in half by eye, right up to the taped join that is a third the way along. The top row in the photo has 6 streamers while the rest has been split into 12 streamers.
Attaching to Sail
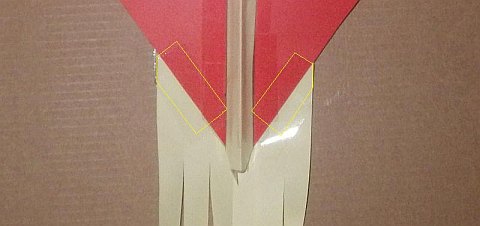
 Tail taped to rear side of sail
- Lay the sail down with the vertical spar against the tabletop or floor.
- Lay the uncut end of the tail over the sail's trailing edge, with the corners touching the edges of the sail. See the photo. Tack in place with just a square of tape.
- When happy with the placement, use a strip of sticking tape all the way across. See the yellow rectangle in the photo.
 Tail taped on front side of sail
- Flip the kite over, and apply sticking tape on each side. See the photo, which also shows how a corner of each piece of tape can be folded around to the other side.
- That's it. You're done!
Flying!
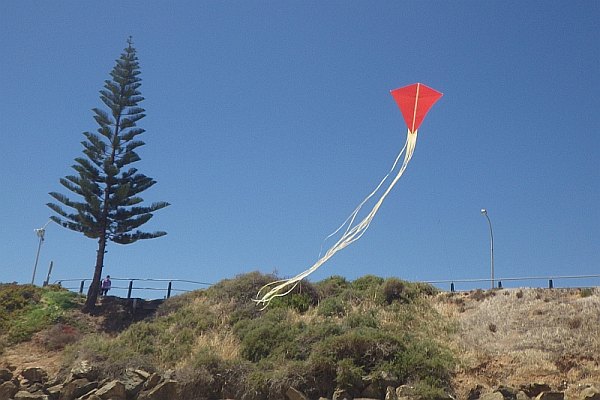 Nothing to it—attach line, catch breeze
After taking the kite to a flying field, your flying line can be tied behind the Multi-Strand Double knot of the bridle lines, wrapped around all the lines. That's it, you're ready to fly.
Avoid flying in very windy weather. The thread should be good to around 35 kph, but there are no guarantees beyond that.
Trimming
If kite and bridle have been made perfectly, the kite should not show an obvious preference for flying to the left or right. What if the diamond does tend to go in one direction much more than the other? Try adding a short length of paper or scrap of plastic to the wingtip that is on the outside of the turn. If the problem gets worse, you have the tail-let on the wrong tip, so just swap it over to the other side!
If the kite seems very reluctant to climb despite plenty of breeze, you might need to retie the bridle—shifting the knot a centimeter or two (1/2 to 1 in.) toward the nose end.
I hope you enjoyed learning how to make the MBK Paper Diamond design!
As mentioned earlier, there's more kite making on this site than you can poke a stick at. :-)
Want to know the most convenient way of using it all?
The Big MBK E-book Bundle is a collection of downloads—printable PDF files which provide step-by-step instructions for many kites large and small.
That's every kite in every MBK series.
