- Home Page
- Paper Kites
- ... Diamond Kite
How to Make a Paper Diamond Kite
Step by Step—Page 2 of 3
The MBK Paper Diamond
The Horizontal Spars
Measure Shapes
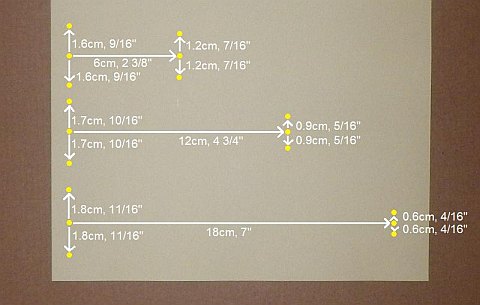 Measured and dots marked
- The bottom of the photo above is a short edge of the paper.
- Measure and mark dots where indicated by the yellow dots in the photo.
Note:
Keep the dots within half the area
of the paper. You can crease the paper in the middle, open out, and
then keep the dots on one side of the crease.
Draw Lines
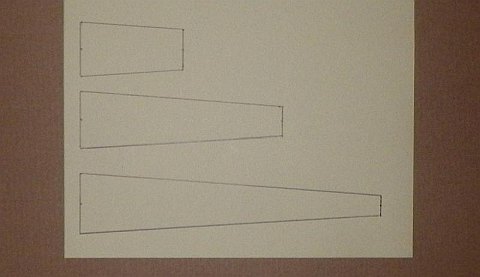 Lines drawn between dots
- Using your ruler, connect the dots as shown. As you can see in the photo, you don't need a line drawn across the middle of each shape.
Duplicate Shapes
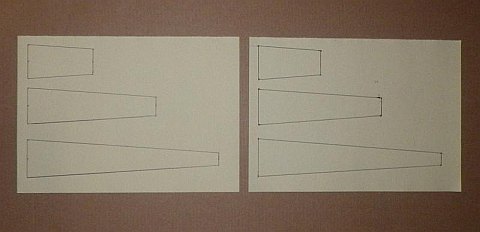 The three shapes duplicated
- Fold down the unmarked half of the paper.
- Trace dots at the positions of the shape corners. Up against a window works well, with sunshine lighting up both thicknesses of paper from behind.
- Tear the paper in half along the crease.
- Rule lines between the corner dots. There's the original and the copy in the photo.
Note: If you have trouble tracing due to dark paper or insufficient light: With a needle, poke holes through the two sheets of paper at the corners of the shapes. Be careful not to let them shift! Then, after tearing the paper in half, rule lines between the pinholes on the blank sheet.
Tape Over
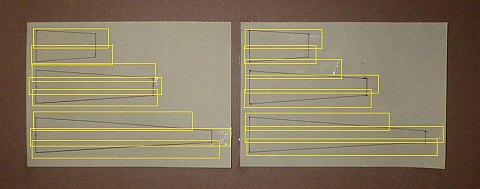 Shapes taped
- Lay strips of sticking tape over the spar shapes as illustrated in the photo.
- The strips of tape can overlap slightly and should cover the shapes completely. That's the only requirement!
Cut Out
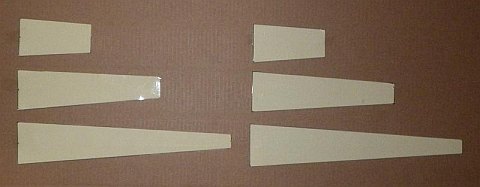 Shapes cut out
- Cut out the shapes, which will be totally covered in tape on one side. A little bit of curl is OK.
Stick Together
 Longest and mid-sized shapes stuck together
- Lay down both the longest shapes with the taped sides facing down.
- Lay a mid-sized shape over the top of each longer shape, also with the taped sides facing down.
- Line up the wide ends exactly, shift the top shape up or down to center it over the lower shape, then stick in place with tape. Also, tack down the narrower end with a square of tape as shown in the photo.
 Shortest shapes added
- Now line up the remaining shapes, taped sides down. Use sticking tape at both ends as before. See the yellow lines in the photo.
Encase in Tape
 Tape laid down over one long edge
- Lay a strip of sticking tape the full length of one spar leaving half the width overhanging.
 Tape folded around long edge
- Fold the overhanging tape around so it sticks to the other side.
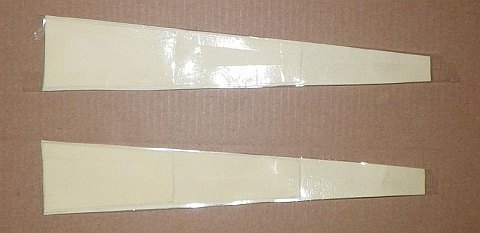 Tape laid and folded around both long edges of both spars before ends trimmed
- In the same way, wrap tape around the three remaining long edges so both spars are almost completely encased in sticking tape.
- Using scissors, trim any overhanging tape from the short edges of the paper spars.
Dihedral Cutouts
 Measured and lines drawn on one spar
- Take a paper spar, and fold in half near the wide end. Create a crease line near the edge.
- Carefully measure 0.3 cm (1/8 in.) along the crease from the edge, and make a small dot.
- Draw lines from the corners to the dot as shown in the photo.
- Measure and draw lines on the other spar in the same way.
Note: A thin gray line has been added to show where the crease is.
 Cutouts done on both spars
- Using scissors, cut along the two ruled lines on both spars to remove the wedges of paper layers. See the two spars in the photo.
Attaching Vertical Spar to Sail
Tape One Edge
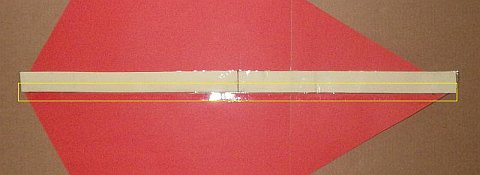 One edge taped before trimming ends
- Take the longest paper spar—the vertical spar—and lay it down, aligned with one of the guide lines as shown. The shortest length of single thickness should be at the nose end of the sail. That's at the left in the photo. The shorter layers of paper should be underneath out of sight.
- Tack in place with squares of sticking tape—at least one in the middle and one near each end.
- All good? Now lay a strip of tape down the whole length as indicated by the yellow rectangle in the photo.
- With scissors, trim off overhanging bits of tape and paper with a single snip at each end.
Tape Other Edge
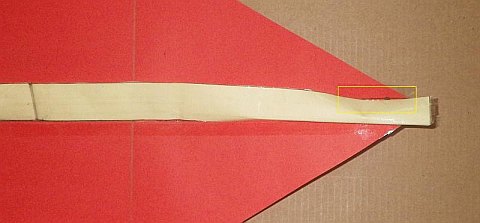 Edge tacked at one end
- Flip the paper spar across and flatten it down so the second guide line becomes visible.
- Go to one end, and pull the free edge of the rectangle across so it lines up with the second guide line. Tack it down with a short strip of tape as indicated in yellow in the photo. See how the second guide line is just visible toward the right in the photo.
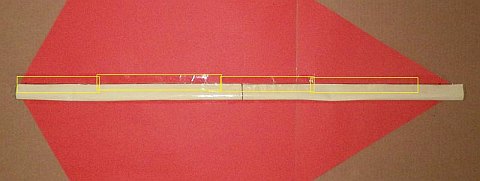 Edge taped the rest of the way before ends trimmed
- Using somewhat longer lengths of tape, tack down more and more of the spar, making sure the edge lines up with the second guide line. Go all the way across to the nose end of the sail as shown in the photo. The tape strips can overlap a little, but don't leave any gaps.
- At each end, trim off any overhanging bits of paper and tape with scissors.
Note: It's just too tricky to tape it all down in one go!
Shape the Spar
 Pinching started at one end
- Go to one end of the spar, and carefully pinch it between finger and thumb as in the photo. The aim is to get a crease right in the middle.
Note: The spar won't crease sharp because of all the sticking tape, but pinch firmly anyway.
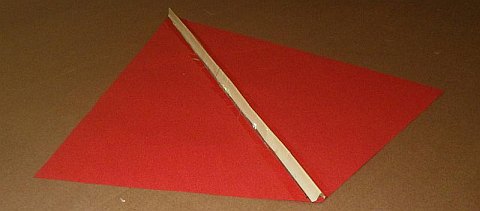 V shape formed all the way along
- Work your way along the spar, pinching tightly all the way. I like to use both hands at once, close together.
- Go all the way along and then back again so nothing is missed. You have created a spar that is stiff enough to do the job required of it! See the photo.
Attaching Horizontal Spars to Sail
Bear in mind that most of the steps below are more easily done on a tabletop with the vertical spar up against one edge of the tabletop. That's to keep the bit you are working on flat!
Tape One Edge
 One edge taped
- Take one of the paper spars, and align it with the upper guide line as shown. The layering of paper should be out of sight on the underside. One corner of the wider end should be touching the centerline of the kite sail, also as shown in the photo.
- Tack in place with squares of sticking tape—one in the middle and one near each end.
- All good? Now lay a strip of tape down the whole length as indicated by the yellow lines in the photo.
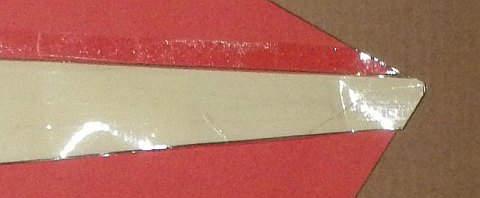 Tape and paper trimmed
- Trim off overhanging bits of tape and paper with two scissor-snips.
Tape Other Edge
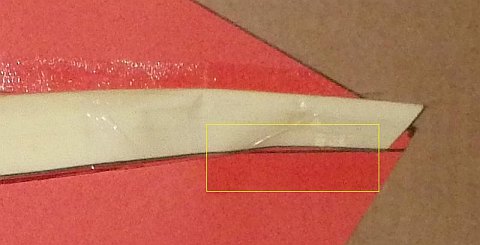 Edge tacked at one end
- Go to the corner of the sail and pull the free edge of the spar back toward the taped edge so the lower guide line becomes visible.
- Tack the edge down with a short strip of tape as indicated in yellow in the photo. See how the lower guide line is visible near the corner of the sail.
 Edge taped all along
- Using somewhat longer lengths of tape, tack down more and more of the spar, making sure the edge lines up with the lower guide line. Go all the way across to the centerline of the sail as shown in the photo. The tape strips can overlap a little, but don't leave any gaps.
Shape the Spar
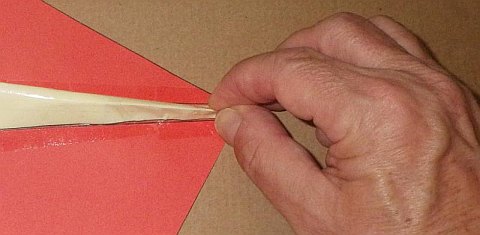 Pinching started at one end
- Go to one end of the spar and carefully pinch it between finger and thumb as in the photo. Just like the vertical spar, the aim is to get a crease right in the middle.
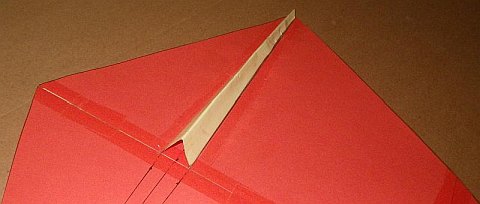 V shape formed all the way along
- Work your way along the spar, pinching tightly all the way. I like to use both hands at once, close together.
- Go all the way along and then back again so nothing is missed. See the photo.
 Both horizontal spars in place and shaped
- Now tape the other horizontal spar in place. Again, the wider end of the spar lines up with the centerline of the sail.
- Shape the spar by pinching as you did for the first one. There they both are, in the photo.
Connect Spars
 Spars secured together with three pieces of tape
- By folding the sail along the centerline, butt the two horizontal spars together in the middle.
- Stick a 5 cm (2 in.) piece of sticking tape across the upper face and another one across the lower face to hold the spars together.
- Stick a 7 cm (3 in.) length of sticky tape over the top and down onto the sail above and below the spars. See the yellow lines on the photo.
As mentioned earlier, there's more kite making on this site than you can poke a stick at. :-)
Want to know the most convenient way of using it all?
The Big MBK E-book Bundle is a collection of downloads—printable PDF files which provide step-by-step instructions for many kites large and small.
That's every kite in every MBK series.
