- Home Page
- Better Kites
- ... Roller Kite
How to Make a Roller Kite
Step by Step—Page 4 of 4
The MBK Dowel Roller
How to Make a Roller Kite
Prepare to Fly

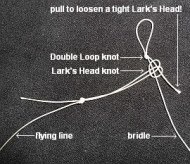
Make up a flying line, and attach it to the bridle with a Lark's Head knot. See the photo up there, where the Lark's Head has been left loose.
The bridle is a bit long to check on the ground, so fly the kite on a very short line to see where the towing point is. Shift the Prusik knot along the bridle line until the towing point appears to be level with the upper horizontal spar or a little below it. To lock the Prusik in place, take the two bridle lines in one hand, the flying line in the other, and pull tight. To unlock it, you just pull the bridle line straight, with the knot in the middle.
Check the bridle slip-knots on the upper horizontal spar. Retighten if necessary, and put a small drop of wood glue on each so they can never come loose. You won't have to wait the full drying time for this glue to dry, since the amounts are small.
How to Make a Roller Kite
Flying!

First, if it's very windy outside, stay home! This is a light-wind kite and won't like being launched in a gale. If the wind is too strong, it might get damaged.
The Prusik knot on the bridle line can loosen off a little over time. If necessary, pull on all the lines to tighten the knot up before a flying session.
Assuming there is some breeze outside, just dangle the kite at arm's length until the wind catches it.
As long as you feel the kite pulling, let out line slowly by taking loop after loop off the winder.
Be
cautious about letting line slip through your fingers. If a big gust
hits the kite, the line could burn you! For any kite this big or bigger,
it's a good idea to wear a glove of some sort.
Another approach is to get a helper to hold the kite up and let it go, on the end of maybe 15 or 20 meters (50 feet) of line. This way, the kite soon gets high enough to make it easy to let more line out.
Out in the Field
Roller-kite stories of my real-life flying experiences are worth checking out!
Illustrated with photos and videos, of course.
Have fun flying, and I hope you've enjoyed learning how to make a roller kite!
The e-book instructions for
this kite include even more handy hints that will ensure you
get the most success possible when flying this particular design. They
show you how to make the kite more transportable too, so you can remove a spar and roll the kite up into a slim bundle.
Now, just in case you have actually made and flown this kite at least once already:
Flight Reports From Other Visitors
Click below to read about various kite-flying adventures, contributed by other visitors to this page...
Dowel Roller Kite — Worth the Effort
I was really excited to build this kite. I used some of the suggested improvements. I built the kite using Tyvek cloth. I made both spars with a 6" bow. …
A Success Story With a Roller Kite
So, got inspired to build a Roller by this site. It took about 6 hours, but I used taffeta nylon instead of a bag. It was OK for a first try...
When …
The MBK Roller
No real story to tell... Grand-kids and I had a lot of fun building this Roller. The next one they're on their own while I do the watching.
They picked …
As mentioned earlier, there's more kite making on this site than you can poke a stick at. :-)
Want to know the most convenient way of using it all?
The Big MBK E-book Bundle is a collection of downloads—printable PDF files which provide step-by-step instructions for many kites large and small.
That's every kite in every MBK series.
