- Home Page
- Better Kites
- ... Star Kite
How to Make a Star Kite
You're going to have fun, learning how to make a star kite the MBK way. :-) This one's a skewer type rather than dowel, so it'll be called an MBK Skewer Star. Most star kites have a curved cross-spar, but we'll stick to straight bits of bamboo skewer for this design.
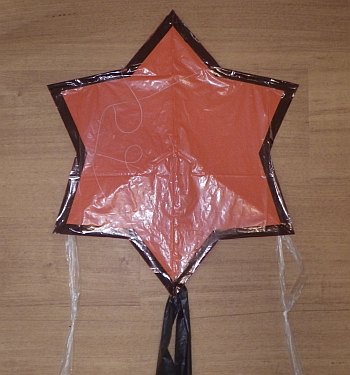 MBK Skewer Star
A star design is a great one to have a dark border all around, don't you think? Why not accent that star shape, I say! See the completed kite in the photo.
Here are some more details on the materials required for making skewer kites. Note that you won't need electrical tape or a calculator for making the Skewer Star.
My approach to the instructions here is not quite as detailed as in my e-books. That is, it doesn't "hold your hand" to the same degree. But between the images and text, all essential info is present.
If you've made kites before, this star design should be pretty easy. Otherwise, just go slow and careful, and it should all come together in the end.
A prototype has been made and tested. So after making a few little adjustments to that design, you should find this new version a great performer as soon as you venture out on a day where leaves and twigs are being moved about.
On this site, there's more kite-making info than you can poke a stick at. :-)
Want to know the most convenient way of using it all?
The Big MBK E-book Bundle is a collection of downloads—printable PDF files which provide step-by-step instructions for many kites large and small.
That's every kite in every MBK series.
Star Kite Sail
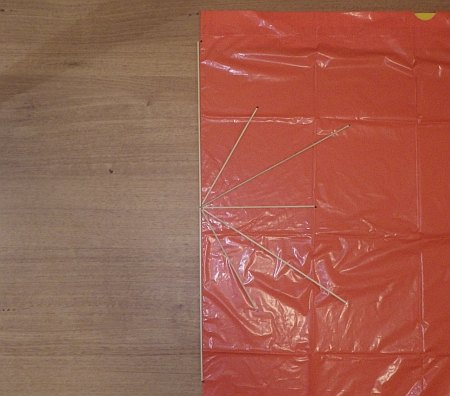 Skewers laid and marks made at tips
- Lay down a plastic bag that is at least 35 cm wide by 70 cm deep (14 in. x 28 in.). Or, if you have a single sheet of plastic, fold it down the left-hand side.
- Place 20 cm (8 in.) and 30 cm (12 in.) skewer lengths on the plastic as shown. Judge the angles by eye to make them all about the same. It's easier to place the longer lengths first. Don't worry if you need to snip the points off; you can still continue with these instructions.
- With a permanent marker, make a dot at the tip of each skewer as shown.
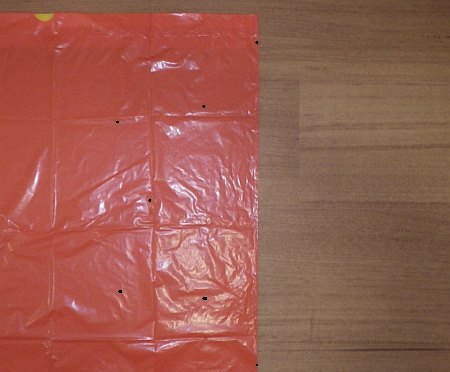 Plastic flipped, dots traced
- Remove the skewers.
- Flip the plastic over, and trace the dots showing through. The dots are easier to see if you place the plastic up against a window on a sunny day. Otherwise, if you can't see through the plastic, try poking holes with a pin to mark the locations.
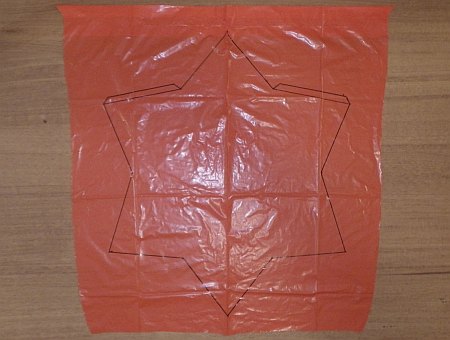 Connect the dots! (And add tabs)
- With scissors, cut the bag so you can open out the plastic. Leave the dots on top.
- Connect the dots using permanent marker and ruler. You haven't this much fun since preschool, heh. ;-)
- Also add two long tabs near the top as shown, about 1.2 cm (1/2 in.) wide.
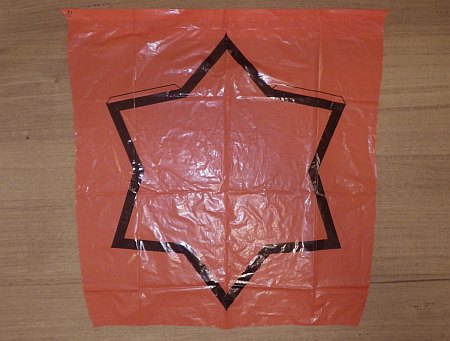 Decoration added
- Apply any decoration you want to with colored permanent markers—all within the star outline, of course. I just added a 2 cm (3/4 in.) wide black border as you can see in the photo. With a bit of imagination, I'm sure you'll know how to make a star kite look even better than mine. :-)
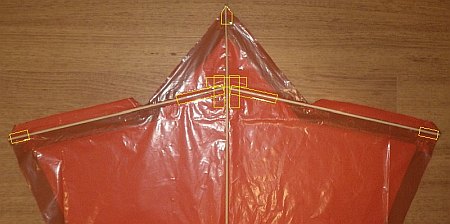 Skewers taped down—upper half
- Cut around the outline so you are left with a star-shaped sail.
- Flip the plastic over so the decoration is against the tabletop or floor.
- Lay down and align bamboo skewers as shown, over the upper half of the sail. Apply sticking tape as indicated by the yellow lines.
Note: The skewers at left and right will be a little too long; trim them to length so they fit as shown.
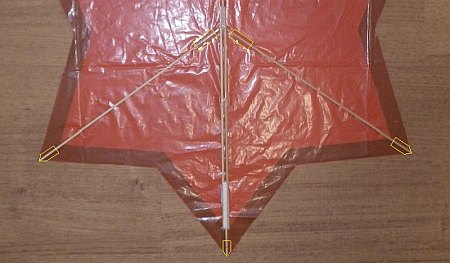 Skewers taped down, glued—lower half
- Lay down and tape more bamboo skewers as shown, over the lower half of the sail. The white bits down the middle are drying wood glue, which secure the overlap sections.
Note: The short piece of bamboo at the bottom end is a 10 cm leftover from when you cut the 20-cm lengths. Also, the two 30-cm skewers that are side-by-side overlap the upper skewer by about 3 cm (1 in.). The overlap at the bottom end is quite a bit more as you can see by the bead of glue.
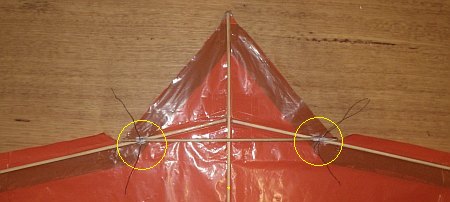 Upper cross-piece bound and glued
- Lay down a 20-cm (8-in.) cross-piece of bamboo skewer as shown. You already have a few as offcuts.
- From 30 cm (12 in.) of polyester sewing thread, tie the free ends to make a loop. Pass the loop three times around a point where skewers cross and tie off. Smear a few drops of wood glue around the joint to secure the six-strand binding.
- Do the other side similarly. Trim off excess thread, if you want to, after the glue has dried.
Note: Do not use any glue on the vertical spar!
 Lower cross-piece bound and glued
- Lay down a 10-cm (4-in.) cross-piece of bamboo skewer as shown. You already have a few as offcuts.
- Secure both ends of the cross-piece just like you did for the longer upper one. Use thread and glue. As before, do not use any glue in the middle!
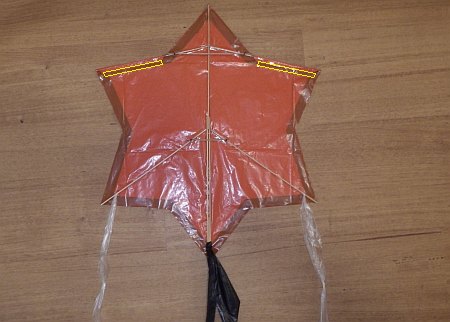 Tabs taped, tails attached
- Pull those tabs down, and tape them in place as indicated in the photo (near top).
- Cut off plenty of 6-cm (2 1/2-in.) -wide loops from some plastic bags.
- Chain the loops together to make three tails, each about 180 cm (70 in.) long. I made the two side tails from very light clear plastic and the central one from slightly heavier black plastic.
- Secure each tail to a spar tip, as shown, by looping it through itself.
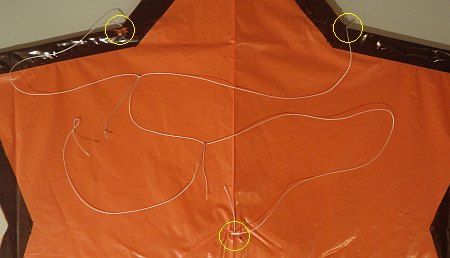 adjustable three-leg bridle
- Cut off a 60-cm (24-in.) length of 20- or 50-pound flying line, and secure it to the horizontal spars where shown. The bamboo is close to the edge of the plastic, so just tie to the bamboo, and bring the line back over the plastic as shown. I used a Double Wrap Slip knot. We'll call this the upper bridle loop.
- Cut off another 60-cm (24-in.) length of line, and secure one end just below the middle of the kite, onto the doubled skewers of the vertical spar. Poke two holes in the sail this time. Feed the line through one hole, around the bamboo a couple of times, and then out the second hole. Then tie off and secure with a drop of glue.
- Tie the other end of the line to the middle of the upper bridle loop using a lockable sliding knot such as the Prusik. We'll call this the vertical bridle loop.
- As a final step, you can tie a short bridle line onto the vertical bridle loop like I've done. Or you can just tie your flying line directly onto the vertical bridle loop. Either way, you should use a sliding lockable knot like the Prusik already mentioned so you can adjust the kite for flight.
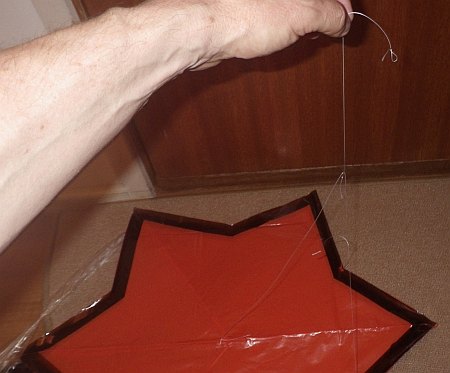 Bridle adjusted for first flight
- Adjust the sliding knot on the upper bridle loop so the "wingtips" hang level.
- Adjust the sliding knot on the vertical bridle loop so the upper bridle loop is perpendicular to the sail when viewed from the side. The nose is pointing to the right in the photo.
Flying!
Now that you know how to make a star kite, it's time to fly your creation.
Go out when you can see leaves and twigs moving about but not if the weather is very windy.
Here are some troubleshooting tips:
- If the kite is reluctant to climb at all despite adequate breeze, shift the lower sliding knot toward the nose a little, and try again.
- If the kite pops up readily but then never gets much height after that, shift the sliding knot toward the tail end instead. Do it just a tiny bit at a time!
- If the kite tends to lean or loop around in one direction most of the time, adjust the sliding knot on the upper bridle loop until the kite flies better. If it gets worse, you know you need to shift the knot back the other way. :-)
On that last point, the adjustment required can be quite tiny; just a millimeter or two can make a difference in fresh breezes.
Finally, in rough air, the kite may occasionally dip its nose and then roll and dive straight to the ground. A reliable cure for this is to tape a tiny stone, about the diameter of an adult fingernail, to the tail end of the sail. Fancy kites can be finicky at times!
Here's a video of this MBK Skewer Star in flight:
I hope you enjoyed learning how to make a star kite!
As mentioned earlier, there's more kite making on this site than you can poke a stick at. :-)
Want to know the most convenient way of using it all?
The Big MBK E-book Bundle is a collection of downloads—printable PDF files which provide step-by-step instructions for many kites large and small.
That's every kite in every MBK series.
