- Home Page
- Soft Kites
- ... Parasail Kite
How to Make a Parasail Kite
Step by Step—Page 1 of 2
The MBK Parasail
Learn how to make a parasail kite with these easy-to-follow instructions. It's fully illustrated with closeup photos every step of the way.
 MBK Parasail
These instructions take you step by step through making a 120 cm (48 in.) diameter parasail. This kite performs well in gentle-to-moderate wind speeds. That's from 12 to 28 kph or from 8 to 18 mph. It pulls hard for its size so should not be flown by very small kids!
The MBK Parasail kite is a very scaled-down version of the full-size parasail craft that is commonly used to tow people high into the air over water. The number of lines and vents has been reduced so the construction is more practical at the smaller size.
As long as the wind speed at least gusts into the gentle-to-moderate range, the kite will climb under pressure and descend like a parachute during the lulls. In a steady horizontal breeze, the kite will hold between 0 and 45 degrees of line angle depending on the air's speed. Unique!
If any rising air comes through, you might be able to watch the kite go much higher!
Materials for this kite:
The kite described here will do well with just about any fairly light plastic sheet. For example, use painters' drop sheet or drop-cloth plastic. That would be about four mil thickness for those buying plastic sheet in the USA. A light sail will help the kite fly in light winds and give a little more stability. The large number of lines ensures that the kite keeps its shape even when under heavy air pressure.
Ordinary clear sticking tape in a dispenser will work for this kite. The slightly wider variety (18 mm or 3/4 in.) is good but not absolutely necessary.
Ideally, the bridle should be made from quite light line, say 20-pound strength, and the kite flown on somewhat heavier line, say 50- or 80-pound strength, since it can pull quite hard in moderate winds.
These instructions illustrate a parasail made with 50-pound bridle lines. This strength of line is readily available from eBay and Amazon online stores.
On this site, there's more kite-making info than you can poke a stick at. :-)
Want to know the most convenient way of using it all?
The Big MBK E-book Bundle is a collection of downloads—printable PDF files which provide step-by-step instructions for many kites large and small.
That's every kite in every MBK series.
How to Make a Parasail Kite
The Sail
Measuring the Sail
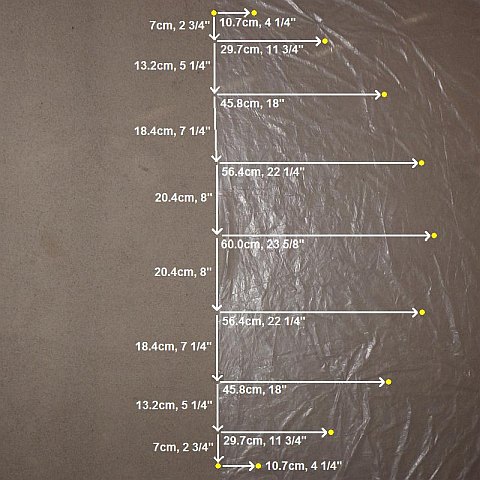 Measure and mark dots
- Place your plastic sheeting on the floor. Fold it in half from left to right, and run a sharp straight crease down the left-hand side.
- Starting from near the top left corner, measure and mark dots on the plastic. Just follow the arrows marked on the photo. I've highlighted the sail outline dots in yellow so they are easier to see in the photo.
Judge the horizontal and vertical directions by eye. If you're careful, there's no need for a T-square, since the sail ends up symmetrical anyway.
Marking the Sail
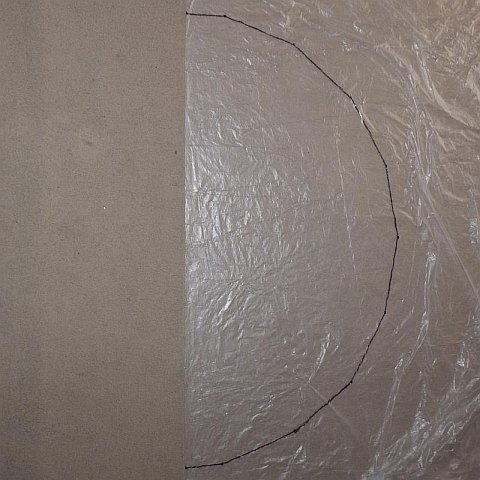 Connect the dots
- Take your ruler, and connect the dots with the black marker pen as shown in the photo. (The top and bottom lines will be horizontal; the camera's perspective has made them look slightly sloped in the photo.)
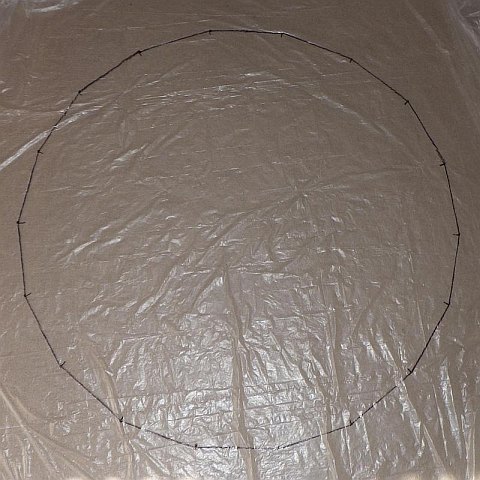 Sail plastic opened out
- Flip all the plastic over. Smooth out the two layers of plastic, double checking that the vertical crease stays in place.
- Make dots at all the corners showing through the two layers of plastic. Then rule in the lines. Keep checking that nothing has slipped!
Hint: If it's too hard to see through the plastic, just lay it up against a sunlit window to mark in the dots.
- Open out the plastic to show the complete sail outline. Finally, mark in short lines at all the corners as in the photo above.
Taping the Sail
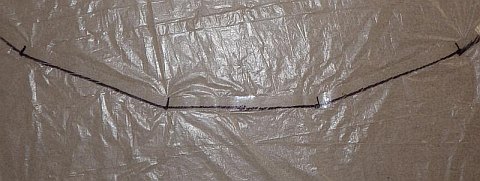 Marked side taped
- Lay clear sticking tape all around the outline of the sail as partly shown in the closeup photo above. Let the tape overlap the black lines, leaving most of the tape inside the outline.
Cutting the Sail
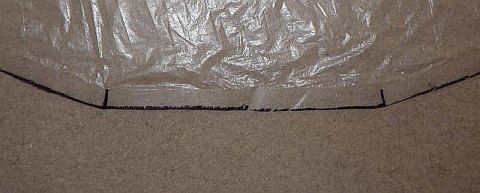 Sail cut
- Take your scissors, and cut all around the outside of the sail along the black lines. When you are finished, all the edges should look like the closeup photo up there.
Measuring the Vents
The vents are opened-up gaps in the sail that are
carefully positioned to shoot air down the back of the parasail in
flight. This is how it can climb like a kite.
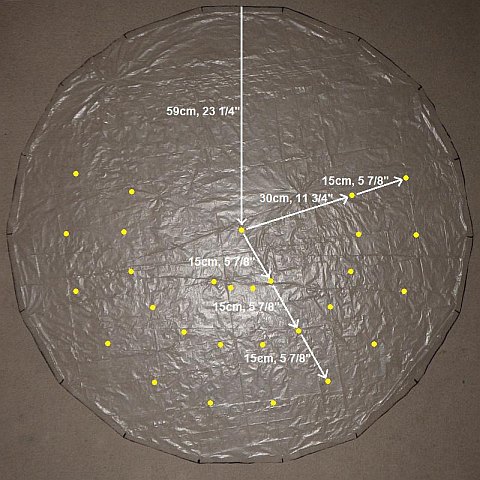 Measure and mark dots
- Spread out the sail plastic on the floor with the marks and tape on top. The crease line (or where it was!) should still be running down the middle from top to bottom.
- Measure and mark the sail center and the other five dots indicated by the arrows marked on the photo above.
- Using the same numbers, measure and mark the remaining dots.
Marking the Vents
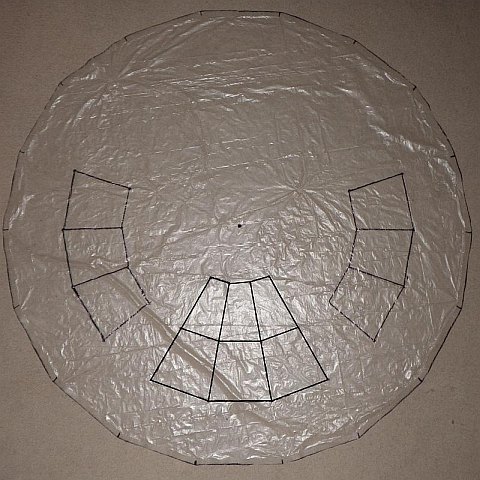 Connect the dots
- Take your ruler, and connect the dots with the black marker pen exactly as shown in the photo.
Marking Vent Slits
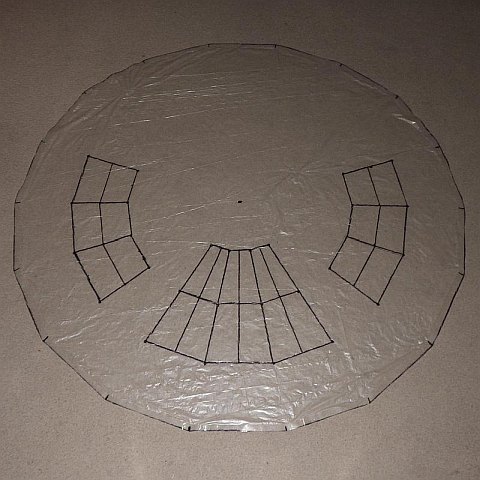 Slit lines drawn
- Take your ruler, and draw lines that divide all the vents in half exactly as shown in the photo. If you want to do this by eye, that will save some time and will have little effect on the kite's flight trim.
(Strictly speaking, some of these lines are unnecessary, but they do give a nice indication of how the vents are positioned! On a second build, you could try marking just where the red lines are, for the cuts: see on the next page.)
Taping, Cutting the Side Vents
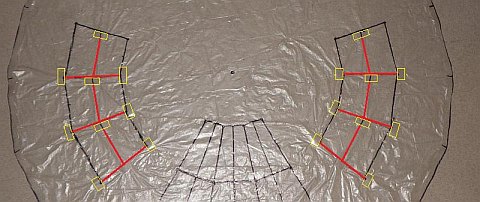 Side vents taped
- Lay lengths of sticking tape for the six side vents as shown in the photo in yellow.
- With scissors, cut along all the lines marked in red above.
Opening the Side Vents
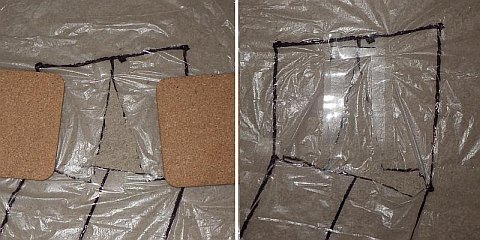 Opening vents, stage 1 (left) and 2 (right)
- Stage 1: Spread the near-vertical split apart so its lower corners are separated by 5 cm (2 in.). Place a small heavy object on each side to hold the split open.
- Stage 2: From scraps of sail plastic, cut out a 5 cm x 11 cm (2 in. x 4 3/8 in.) rectangle and secure it over the split with three pieces of sticking tape.
As mentioned earlier, there's more kite making on this site than you can poke a stick at. :-)
Want to know the most convenient way of using it all?
The Big MBK E-book Bundle is a collection of downloads—printable PDF files which provide step-by-step instructions for many kites large and small.
That's every kite in every MBK series.
