- Home Page
- Soft Kites
- ... Parafoil Kite
How to Make a Parafoil Kite
Step by Step — Page 1 of 3
The MBK Parafoil
Learn how to make a parafoil kite with these easy-to-follow instructions. It's fully illustrated with closeup photos every step of the way.
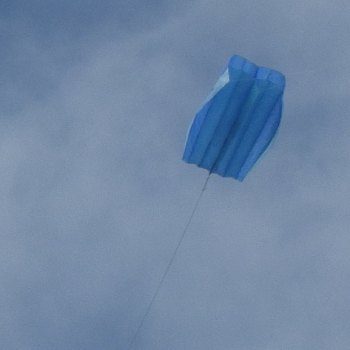 MBK Parafoil
These instructions will take you step by step through making a 120 cm (48 in.) tall parafoil kite.
This four-cell kite performs best in gentle to moderate wind speeds. That's 12 to 28 kph or 8 to 18 mph. Even in light winds, this kite will hang in the air although at low line angles. In fresh winds, it pulls firmly for its size, so small kids should only fly it while supervised!
Some of the lines are longer than the standard 30 cm (12 in.) of most rulers. So a handy trick is to stretch out a length of flying line, weigh it down at each end, and then make several dots beside it—less than a ruler length apart. The dots can then be joined by using your ruler. With care, you will end up with a perfectly straight long ruled line every time.
The MBK Parafoil kite is inspired by similar-looking retail kites, some of which are quite large and expensive. However, this tape-and-plastic version works in exactly the same way and has been tested up to 200 feet off the ground.
Materials for this kite
The kite described here will do well with just about any fairly robust plastic sheet. For example, use heavy-duty painters' drop sheet or drop-cloth plastic. That would be around four mil thickness for those buying plastic sheet in the US. My kite also used council bin-liner plastic, which is somewhat thicker and stronger than trash can (rubbish bin) liners.
Ordinary clear sticking tape in a dispenser is good for tacking seams together before laying down 5 cm (2 in.) clear packing tape for strength and stiffness. Other edges just require sticking tape alone. I used the 1.8 cm (3/4 in.) wide variety.
These instructions illustrate a parafoil made with 50 pound (strength) Dacron bridle lines. This type of line is readily available from eBay and Amazon online stores.
Upper and Lower Surfaces
When this kite flies, one surface of the sail faces the sky—the upper surface. The other surface is easily visible from the ground—the lower surface. In between the two surfaces are vertical panels I will refer to as dividers.
On this site, there's more kite-making info than you can poke a stick at. :-)
Want to know the most convenient way of using it all?
The Big MBK E-book Bundle is a collection of downloads—printable PDF files which provide step-by-step instructions for many kites large and small.
That's every kite in every MBK series.
How to Make a Parafoil Kite
Upper
Surface and Side Keels
Measuring Upper Surface and Side Keels
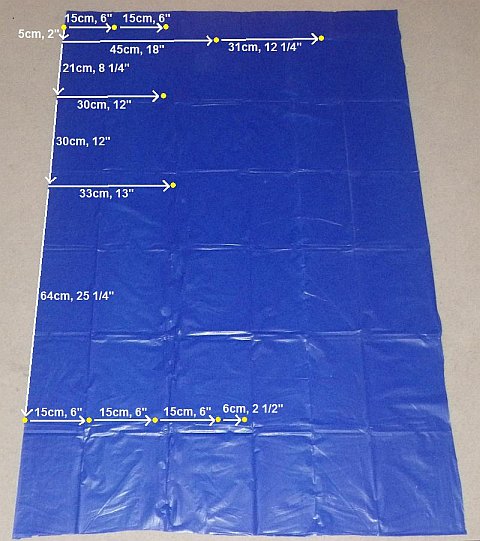 Dots measured and marked
- Place your plastic sheeting on the floor. Fold it in half from left to right, and run a sharp straight crease down the left-hand side.
- Starting from near the top left corner, measure and mark dots on the plastic. Just follow the arrows marked on the photo. Dots have been highlighted in yellow.
Judge the horizontal directions by eye. If you're careful, there's no need for a T-square, since the sail ends up symmetrical anyway.
Completing Dots for Upper Surface and Side Keels
Half the dots
are already marked, so now you mark in the remaining ones. Almost
invisible in the photo below, but they are all there, small and in
black:
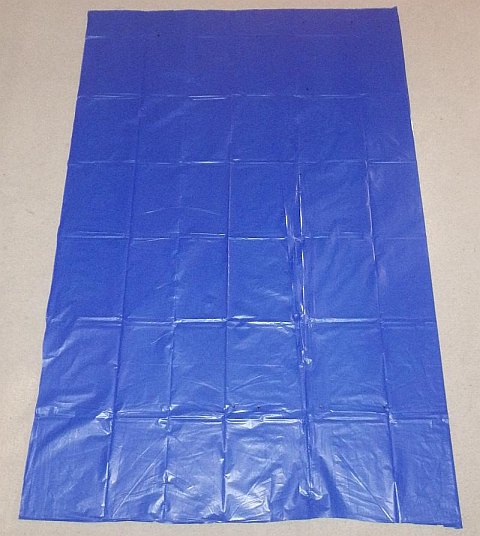 Plastic flipped, dots traced
- Flip all the plastic over. Smooth out the two layers of plastic, double checking that the vertical crease stays in place. The crease is now on the right in the photo up there.
- Make dots over all the dots showing through the two layers of plastic. Keep checking that nothing has slipped!
Hint: If it's too hard to see through the plastic, just lay it up against a sunlit window to mark in the dots.
Drawing Lines for Upper Surface and Side Keels
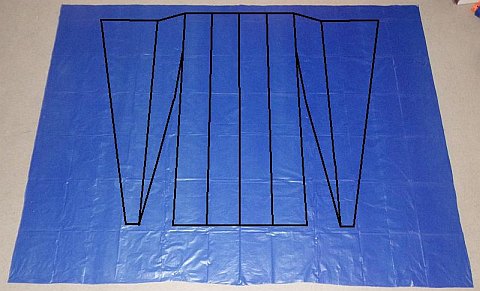 All lines marked
- Open out the sheet of plastic, and lay it flat.
- Connect the dots with marked lines as shown in the photo. Some lines are panel outlines, while others are internal guide lines. The central crease is also drawn over.
Note: The photo has been edited to make the lines darker and easier to see.
Taping Upper Surface and Side Keels
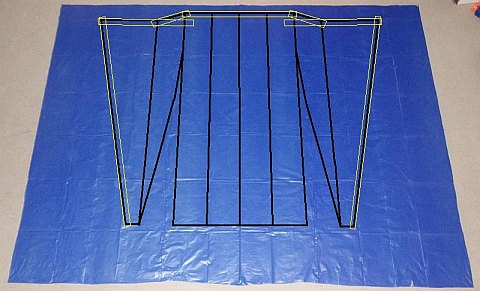 Where to put sticking tape edging
- Lay down 1.8 cm (3/4 in.) sticking tape where indicated by yellow rectangles in the photo above. Note that most of the tape is stuck inside the outline.
Cutting Upper Surface and Side Keels
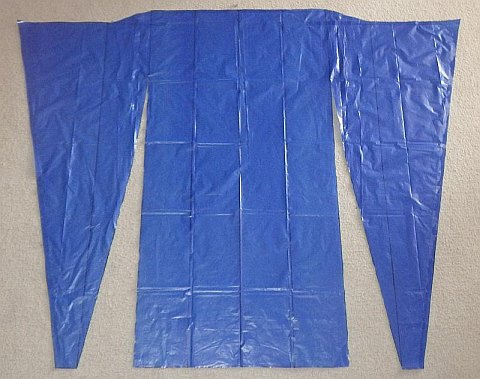 Upper surface sheet cut
- Take your scissors, and cut all around the outside of the shape along the black lines. Follow those wedge-shaped cutouts as well.
- When you are finished, the plastic should look like the photo up there. Internal guide lines are still intact although a little hard to see in the photo.
Closing Upper Surface Cutouts
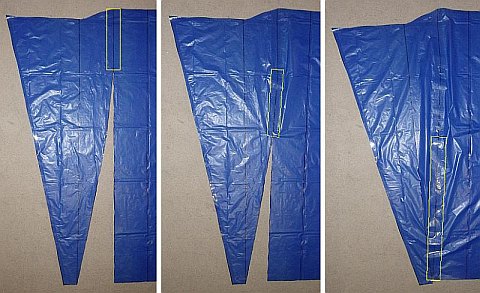 A cutout closed and taped up
- Ensure the plastic is lying with all the edging tape facing away from the floor. The photo on the left shows where some 5 cm (2 in.) packing tape is placed over a guide line. Notice how the cutout needs to close up in two stages:
- Bring the first set of edges together and hold with small bits of sticking tape.
- When satisfied that it lines up well, lay 5 cm (2 in.) packing tape down all the first join. See the photo in the middle.
- In the same way, tape the second set of edges. See the photo on the right.
- Move over to the other side of the plastic, and do all the above again on the other cutout.
Making the Central Keel
Measuring and Drawing the Central Keel
I have used orange plastic for this keel.
Contrasting colors make it easier to see what is going on in later
stages of construction.
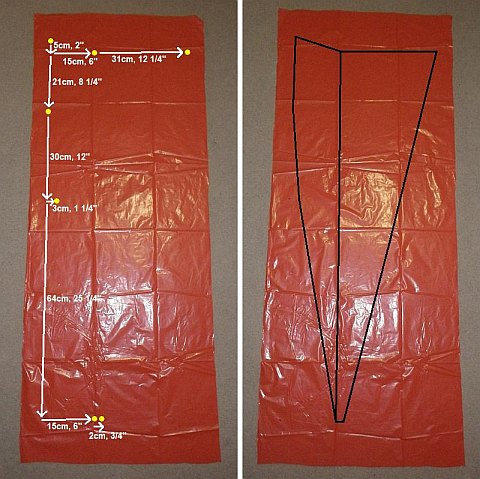 Dots measured, marked, and connected
- Starting from near the top left corner, measure and mark dots on the plastic. Follow the arrows marked on the photo on the left. The dots are highlighted in yellow.
- Connect the dots with marked lines as shown in the photo on the right.
Taping and Cutting the Central Keel
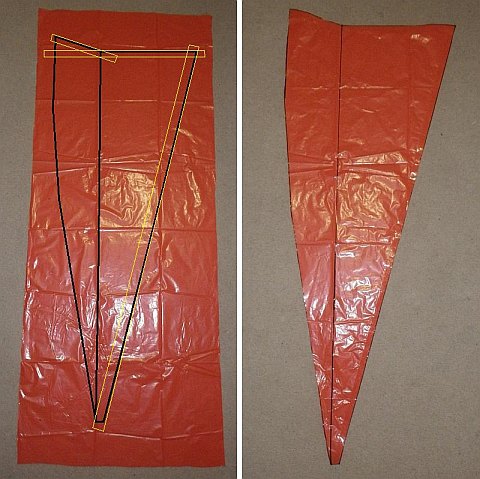 Central keel taped and cut out
- Lay down sticking tape as indicated by the yellow rectangles in the photo on the left.
- Flip the plastic over, and lay down more sticking tape so the taping is the same on both sides. I flipped it back again before cutting.
- Cut all around the shape of the keel. See the photo on the right.
Making Lower Surface and Dividers
Measuring Lower Surface and Dividers
Start with a fresh sheet of plastic. This is
similar to the very first step—"Measuring Upper Surface and Side
Keels." I used a lighter shade of blue plastic for the lower
surface.
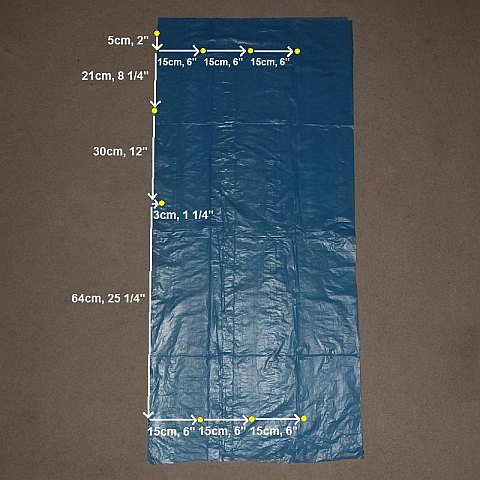 Dots measured and marked
- Place your plastic sheeting on the floor. Fold it in half from left to right, and run a sharp straight crease down the left-hand side.
- Starting from near the top left corner, measure and mark dots on the plastic. Just follow the arrows marked on the photo. I've highlighted the dots in yellow so they are easier to see in the photo.
Completing Dots for Lower Surface and Dividers
Half the dots
are already marked, so now you mark in the remaining ones. They
haven't been highlighted this time, but they are all there, small and
in black.
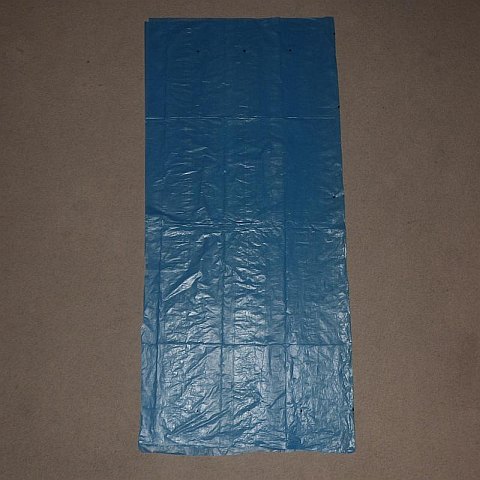 Plastic flipped, dots traced
- Flip all the plastic over. Smooth out the two layers of plastic, double checking that the vertical crease stays in place.
- Make dots over all the dots showing through the two layers of plastic. Keep checking that nothing has slipped!
Drawing Lines for Lower Surface and Dividers
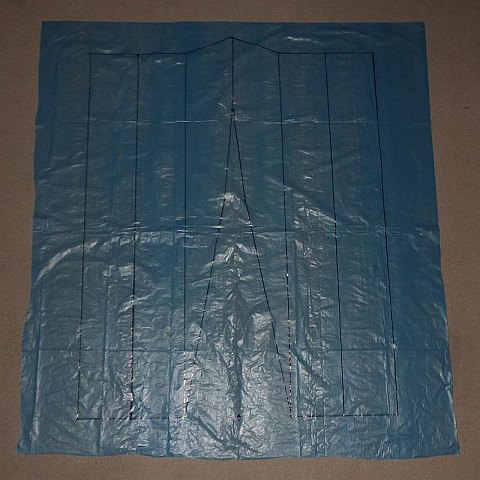 Lower surface lines drawn
- Open out the sheet of plastic, and lay it flat.
- Connect the dots with marked lines as shown in the photo. Some lines are panel outlines, while others are internal guide lines.
Taping Lower Surface and Dividers
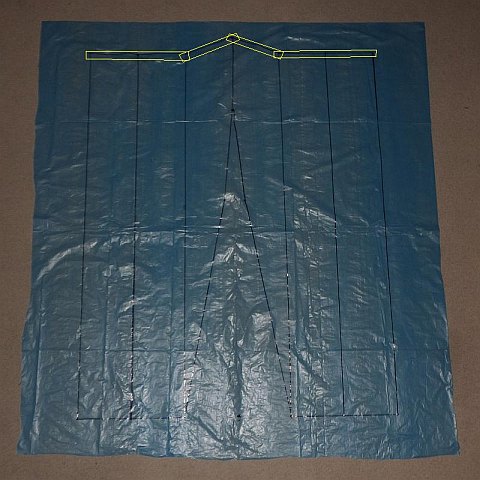 Where to put the sticking tape
- Lay down sticking tape where indicated by yellow rectangles in the photo above.
Cutting Lower Surface and Dividers
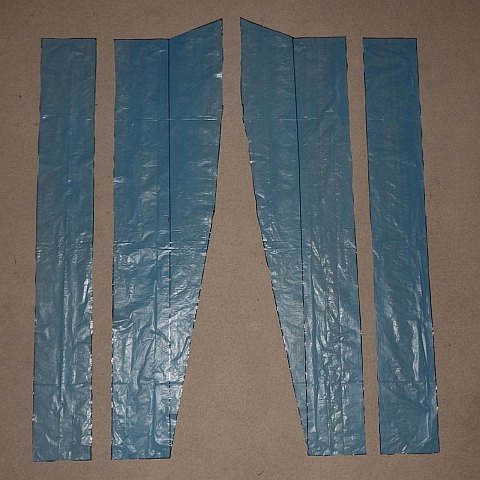 Pieces cut, ready to assemble
- Take your scissors, and cut all around the outside of the shape along the lines.
- Cut along the vertical centerline so the shape separates into left and right pieces.
- Cut off the rectangles at far left and far right. When you are finished, the panels should look like the photo up there with some internal guide lines showing. See if you can cut along the lines better than I did!
Assembling the Sail
Attaching the Central Keel—a)
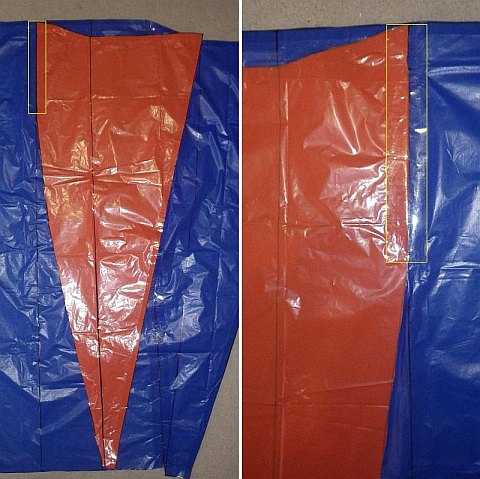 An edge taped to the centerline of the upper surface plastic
- Lay down the upper surface plastic with the tape edging facing up.
- Referring to the photo on the left, line up the central keel with the centerline of the upper surface plastic, and run 5 cm (2 in.) packing tape the full length of the join. See the yellow rectangle. Trim off any excess tape with scissors.
- Flip the keel over, as in the closeup photo on the right, and fold the join down as flat as possible. Run packing tape down the join as before.
Attaching the Central Keel—b)
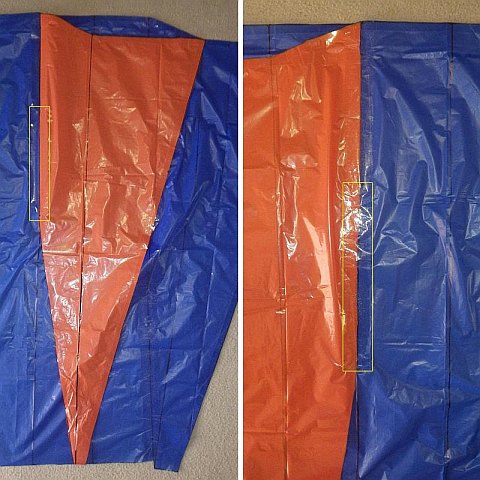 Next edge of keel taped to centerline of upper surface plastic
- After taping in the previous step, continue by holding the next keel edge in place with one or two small pieces of sticking tape—along the black line as before.
- When satisfied that it looks good, run 5 cm (2 in.) packing tape along the join—as illustrated by the yellow rectangle in the photo on the left.
- Now flip the keel over, flatten out the join, and run packing tape along it as in the closeup photo on the right.
Attaching the Central Keel—c)
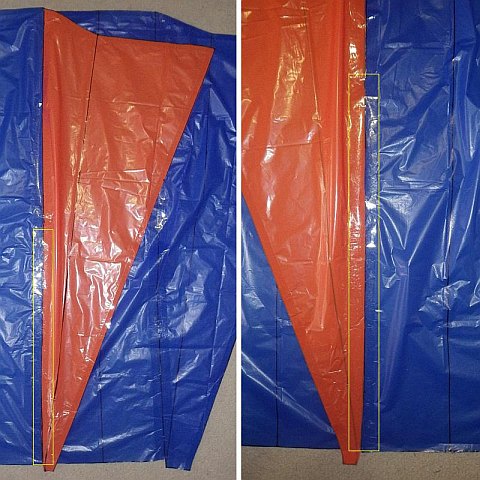 Completed taping of keel to centerline of upper surface plastic
- After taping in the previous step, continue by holding the last keel edge in place with two or three small pieces of sticking tape—along the black line as before.
- When satisfied that it looks good, run 5 cm (2 in.) packing tape along the join—as illustrated by the yellow rectangle in the photo on the left.
- Now flip the keel over, flatten out the join, and run packing tape along it as in the closeup photo on the right.
As mentioned earlier, there's more kite making on this site than you can poke a stick at. :-)
Want to know the most convenient way of using it all?
The Big MBK E-book Bundle is a collection of downloads—printable PDF files which provide step-by-step instructions for many kites large and small.
That's every kite in every MBK series.
