- Home Page
- Better Kites
- ... Dopero Kite
How to Make a Dopero Kite
Step by Step—Page 1 of 4
This set of instructions on how to make a dopero kite assumes you know absolutely nothing about kite making. You might already have some
of the simple tools and materials required.
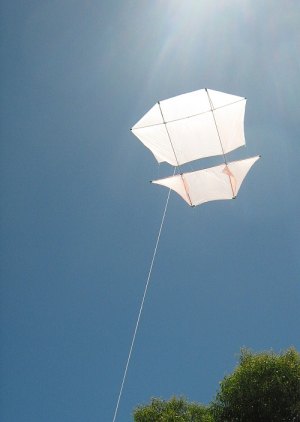 MBK Dowel Dopero
Anything you don't have is easily bought. If it's not exactly what I used, then at least something pretty similar!
The Dowel Dopero is a large tailless kite loosely based on the original double-roller design. Like the original, this kite is a great light-to-moderate-wind flier.
These instructions might look quite detailed. However, your reward is a large very cheap kite that has a distinctive aircraft-like look in the air.
Thanks to its four-point bridle, this kite can cope with rather more wind speed than its cousin the roller—without losing its ability in very light breezes too.
This kite should fit in most vehicles. Of course it helps if you undo the bow-line toggles. Then the kite can lie flat in the trunk (boot) or even rest on one edge in the rear passenger section.
Setting up on the flying field is just a matter of attaching the bow line toggles. Or perhaps not, if you were able to leave them done up. Then you just attach the flying line and launch into the wild blue yonder!
I have chosen to make "One Dowel Length" equal to 120 cm for every kite in the Dowel Series. If you are in North America, 48 in. of 3/16 in. dowel is close enough to 120 cm of 5 mm dowel. This will result in a kite with similar flying characteristics to my original. Make sure to find a hardwood type for your dowel.
On this site, there's more kite-making info than you can poke a stick at. :-)
Want to know the most convenient way of using it all?
The Big MBK E-book Bundle is a collection of downloads—printable PDF files which provide step-by-step instructions for many kites large and small.
That's every kite in every MBK series.
How to Make a Dopero Kite
Cutting the Sail
Now's the time to read up on the kite-making tools and materials required for making a Dowel Dopero, if you haven't already. For this kite, you will also need some cheap thin shoelaces.
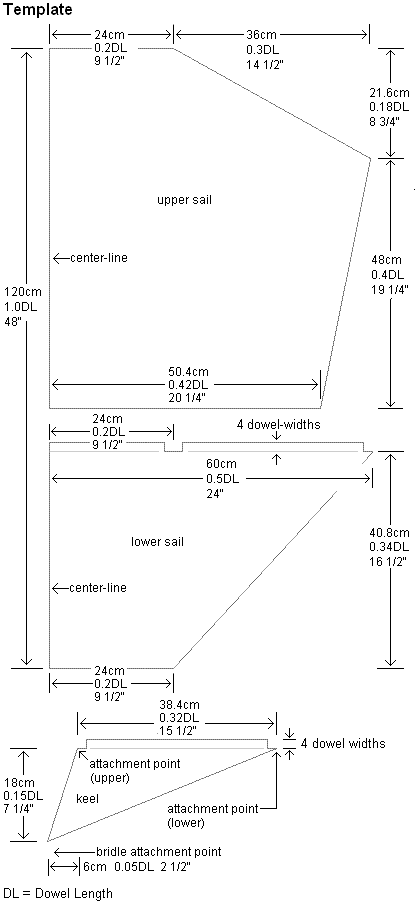
The template shown above represents one side of the kite sail. You will now transfer these measurements to the sail plastic.
Like to see a video clip? Just scroll down to near the end of this page.
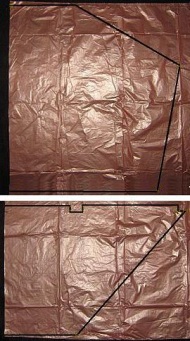
- First, take a large bag that you want to use for the sail, and lay it flat on the floor.
- Mark dots on the plastic that correspond to the corners of the template. There is no need to use a T-square or an extra-long ruler, since any small errors in position will be duplicated on the other side of the sail.
- Using the marking pen, rule lines between the dots as in the photo. For lines longer than the ruler, just add a few extra dots using one of the dowel spars as a ruler! Then it's easy to connect the dots with a ruler. It's probably best not to rule the whole line with the dowel, since it bends easily.
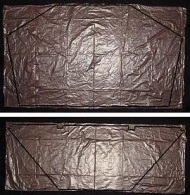
- Flip the plastic bag over, and trace over all the black lines using your marker pen and ruler.
- Cut
out a rectangular section of the bag containing the kite sail, open it
out, and lay it flat on the floor; you can now see the complete sail outline as in the photos.
When doing the following, most of the width of the tape should be inside
the kite's outline:
Use a single length of tape for each line. Hold it
out straight; touch it down to the plastic at one end then at the other
end; dab it down in the middle, then press down all along its length.
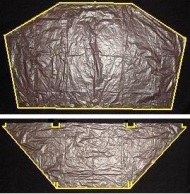
- Lay down clear sticking tape where indicated by the yellow lines in the two photos.
- With scissors, cut along all the black lines. This will leave most of the width of the sticking tape inside the sail outline.
As mentioned earlier, there's more kite making on this site than you can poke a stick at. :-)
Want to know the most convenient way of using it all?
The Big MBK E-book Bundle is a collection of downloads—printable PDF files which provide step-by-step instructions for many kites large and small.
That's every kite in every MBK series.
