- Home Page
- Better Kites
- ... Dopero Kite
How to Build a Dopero Kite
Step by Step—Page 1 of 3
The MBK 2-Skewer Dopero
This set of instructions on how to build a dopero kite assumes you know absolutely nothing about kite making. You might already have some
of the simple tools and materials required.
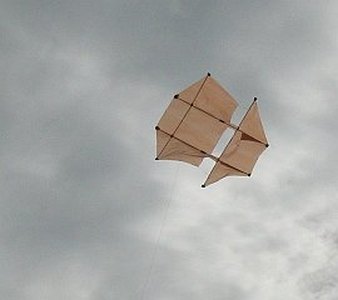 MBK 2-Skewer Dopero
Anything you don't have is easily bought. If it's not exactly what I used, then at least something pretty similar!
The MBK 2-Skewer Dopero kite is small compared to shop-bought doperos at 58 cm (23 in.) across and tall. Some dihedral on the outer panels of both the upper and lower sails give good all-round stability without the need for a tail.
This 2-Skewer Dopero is an efficient light-wind flier. Take it out when it's not very windy, and you won't be disappointed. Also, the four-leg bridle keeps the frame rigid, letting this kite cope with stronger winds as well.
This little kite's claim to fame is sitting up high over the beach one day, when nearly all other kites had descended to the sand—at the Adelaide International Kite Festival! The icing on the cake was when the commentator noticed and made some remark about it over the PA. :-)
On this site, there's more kite-making info than you can poke a stick at. :-)
Want to know the most convenient way of using it all?
The Big MBK E-book Bundle is a collection of downloads—printable PDF files which provide step-by-step instructions for many kites large and small.
That's every kite in every MBK series.
How to Build a Dopero Kite
Frame
Have you read the page on kite materials? If you haven't already, do it now to see what's needed for building a dopero kite.
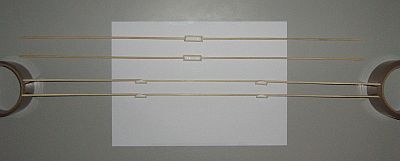
For this dopero, you need to glue skewers together to form the four spars. Since this kite has plenty of sail area for its width, there is no need to worry about selecting the lightest skewers! In fact, stiffer and heavier skewers would be good for the vertical spars. As for any kite, it's best to try and match the left and right ends of the horizontal spars as well. Having said all that, just using any old skewers at random should not present any real problems. The wind range of the kite might not be as good as it could be; that's all. You can always add a bit of tail!
- Snip the points off four skewers, then check to see that they are all exactly the same length; measure it; this is one skewer length.
- Snip another four skewers to a length of 0.65 SL (18.9 cm, 7 1/2 in.) each.
- Snip another two skewers to a length of 0.7 SL (20.3 cm, 8 in.) each.
- From the scraps of bamboo left over, snip off six lengths of bamboo, each 0.06 SL (1.7 cm, 3/4 in.) long. These are the short reinforcers for the three-part horizontal spars.
- Similarly, snip off four more lengths of bamboo, each 0.1 SL long. These are for the two-part vertical spars.
- Arrange all the skewers as in the photo, with some paper underneath to later catch excess glue. Tape the paper to the tabletop to prevent it shifting.
- You should have two short reinforcers left over. On one of the three-part spars, add these reinforcers so there are two beside each join, one on each side. (The photo is wrong; this mod was done after test flying!)
- Prop up each end of the three-part horizontal spars to 0.15 SL (4.4 cm, 1 3/4 in.) above the table to give them dihedral.
- Get down to tabletop height, and look along the spars, and make sure everything lines up well.
- Lay down a thick line of glue all the way down each join as in the photo.
How to Build a Dopero Kite
Sail
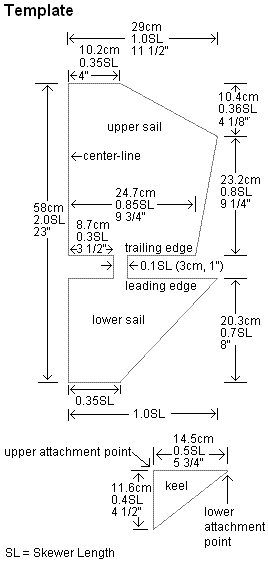
The template shown above represents one side of the kite sail. You will now transfer these measurements to the sail plastic.
Like to see a video clip? Just scroll down to near the end of this page.
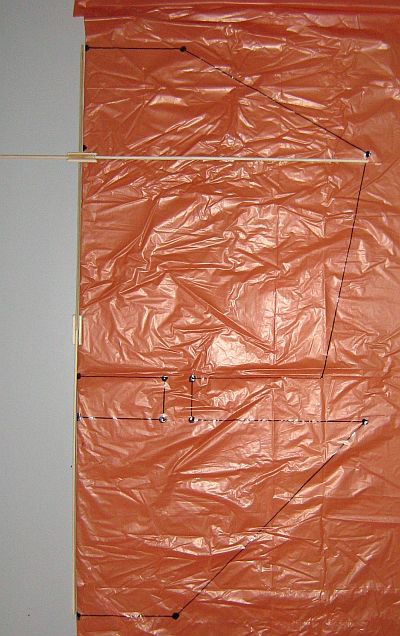
- First, take the large bag that you will be using for the sail, and lay it flat on the table.
- Make sure all the glue is dry, then lay one of the vertical spars on the edge of the bag, and mark the position of the nose and tail of the kite.
- With a ruler, measure and mark all the other points except the "wingtips" of the upper and lower sails.
- Mark the "wingtips", laying down a vertical spar to find the upper and lower wingtip positions. You can't use one of the horizontal spars, since they're not straight!
- Use the marking pen to rule lines between the dots. See the photo.
Note: Arranging the spars on the plastic by eye is quite accurate enough as long as you take some care. Since both sides of the sail will be identical, any small error in judging the 90-degree angle has almost no effect. I have made the dots big just so they show up easily in the photo.
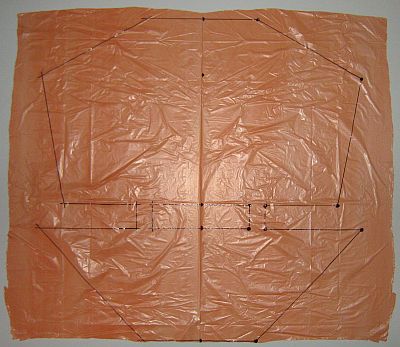
- Flip the plastic bag over, and trace over all the black lines using your marker pen and ruler.
- Cut out a rectangular section of the bag containing the kite sail, open it out, and lay it flat on the table. You can now see the complete sail outline as in the photo.
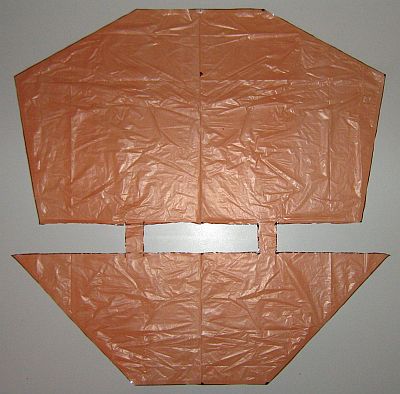
- Lay clear sticking tape along all the lines except the trailing edge of the upper sail and the leading edge of the lower sail. Each taped line should show through the center of the tape.
- With scissors, cut along the all the black lines. This will leave half the width of the sticking tape inside the sail outline.
Note 1: I pull off the length of tape required plus a bit extra on each end then lay it down in one motion, pressing to the plastic at both ends at once. Then I smooth along the tape with a finger, making sure it is stuck down firmly along its entire length.
Note 2: Don't worry about overlapping lengths of tape at the corners; it will all look tidier after the cutting is done.
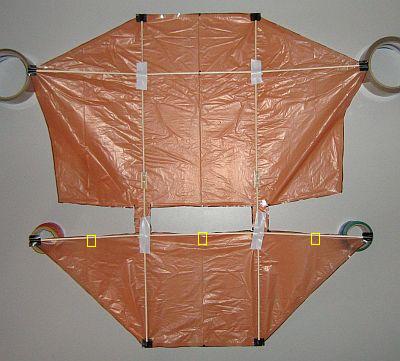
- Place one long vertical spar over the plastic, with the edge tape facing up.
- Cap the ends of the spar with electrical tape, as in the photo, by sticking it down over the bamboo and plastic then folding it under the plastic to stick on the other side—a bit tricky, so take your time!
- Do the other vertical spar in the same way.
- Next, lay down the upper horizontal spar, and secure it with longer strips of tape as in the photo—that's the white tape, which is temporary.
- Cap each end of the spar with electrical tape. Pull the slack out of the plastic, but don't pull it really tight.
- Do the same for the lower horizontal spar.
- Finally, add pieces of clear sticking tape where indicated by the yellow rectangles. Stick them down to the plastic and bamboo, then fold around to the other side.
- Remove the temporary strips of tape where the spars cross. Also, it might be handy to support the spar tips as in the photo.
- Secure the upper and lower horizontal spars to the vertical spars with drops of glue, above and below where the spars cross.
As mentioned earlier, there's more kite making on this site than you can poke a stick at. :-)
Want to know the most convenient way of using it all?
The Big MBK E-book Bundle is a collection of downloads—printable PDF files which provide step-by-step instructions for many kites large and small.
That's every kite in every MBK series.
