- Home Page
- Stunt Kites
- PP Kite Review
Peter Powell Kite Review
The Sky Stunter MkIII
This Peter Powell kite review concerns the successor to the classic Sky Stunter MkII. Peter's two sons have come up with the MkIII, initially without their dad's knowledge!
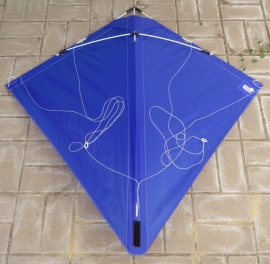
 Our own PP MkIII
Peter himself passed away in January 2016. The news reverberated
around the kiting world—while easy-to-fly steerable kites continue to
be popular.
The MkIII is essentially the same diamond-shaped design as the older kites, but it uses some more up-to-date construction techniques and materials.
The new kite has been very well tested, at times to destruction (apparently), in the quest for a tough but versatile design for family use.
At this writing we cannot vouch for the toughness aspect since I haven't subjected it to a decent crash as yet! But just handling it and looking at it, it's clearly not fragile.
(An update in 2020: During a
club fly one day, after a moment of indecision near the end of a fast
vertical dive, I managed to smack the kite into the sand at full speed. A
spar popped out of its socket, but no damage was done! This was a credit to the
Powell brothers.)
So, this review will just focus on getting it out of the packaging and into the air.

On this site, there's more kite-making info than you can poke a stick at :-)
Want to know the most convenient way of using it all?
The Big MBK E-book Bundle is a collection of downloads—printable PDF files which provide step-by-step instructions for many kites large and small.
Every kite in every MBK series.
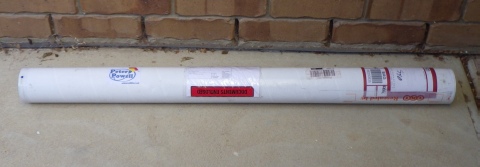
Out of the Tube
This kite arrives in a sturdy PVC tube with plenty of tape securing the end plugs:
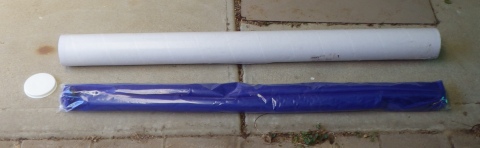
Out comes the kite bag, protected by a clear plastic sleeve:
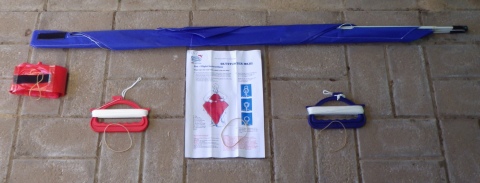
The contents slip out as one, helped by a few large rubber bands around various items:

So, when you go out to fly, the kite bag contains just three items:
- the kite itself
- a pair of handles wound with line
- the long tubular tail
It's so simple!
The rubber bands can be put aside for other uses. In our case, they were gratefully received (as toys) by our 8-year-old :-) The single-page pamphlet does an excellent job of covering all required information regarding setup and flying issues. It's clear, simple, and accurate—English by Englishmen.
Preparing for Flight
Surprisingly, I initially had some difficulty with the simple task of inserting the cross struts into the center molding (I use American spelling on this site). The first one went in OK but the second seemed to take a lot of effort.
According to the instructions, it's done by "bending rod as required." Which rod? The cross spar or the vertical spar? After some practice, it all gets a lot easier. Just bend everything!
Perhaps a tiny tweak to the instructions might help here. It's super-simple, fool-proof, and feels really strong and solid when in place. The vertical rod can end up slightly off-center but is easily pushed across the sail into position.
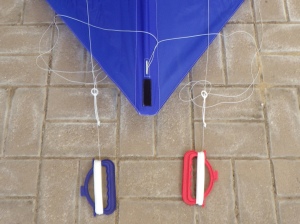
Attaching the handles is very simple, as illustrated by some diagrams on the pamphlet. There are no excuses for not getting this right, first time!
It just involves poking the loops through the rings and feeding the loop ends back around the rings. It's better explained via pictures than words, for sure.
Attaching the tail is so simple you could train your dog to do it—if it had hands. A Velcro patch at one end of the tail is pressed to a corresponding patch on the kite. Again, it was super simple, as it should be.
Flying the Sky Stunter MkIII
Down at the beach, there was a somewhat offshore breeze, so it was not as smooth as an onshore breeze would have been. Never-the-less, the moderate-strength gusts gave ample opportunities to get a feel for how this kite behaves.
Take-Off
After one or two failed attempts due to insufficient wind, the bright-blue diamond finally soared away from the sand. It took off at an angle, but I just held on and let it gain height for a few seconds before pulling back a little on one handle. Obediently, the diamond turned a little, now heading straight up. Nice! So far so good as it sat there at a high angle, almost motionless.
We had attached the tail, which streamed out behind, despite a few small tangles near the middle. Later on, I noticed that the tube had sorted itself out, filled with air from end to end. This was a wonderful spectacle that did not go unnoticed as people walked here and there along the beach.
I should mention that the lines turned out to be slightly mismatched in length. For some reason I had expected them to be precisely the same length. However, this did not matter one bit. It's easy to just wind on a few turns to bring the longer line down to the right length.
Although there was no mention of it in the instructions, it was fairly clear that the lines were meant to be wrapped around a small protrusion on each handle, before exiting through a tiny slot. This anchored each line near the middle knuckle of each hand.
The same tiny slot is handy for stopping the line from unwinding when the handles are being transported.
General Feel
The breeze would die from time to time, forcing me to scamper upwind with the kite hanging on just one line. That's right, there wasn't even enough air to execute a turn!
But for perhaps 10 to 20 seconds at a time, the gust strength was sufficient to put the kite through some basic steering maneuvers. Without expensive lines, the feel was slightly spongy, but the kite responded smoothly and proportionally to the handle movements.
With the lowish wind speeds, the kite required quite large control movements to get any turn started. I expect this situation will change in fresh wind! I had fun doing passes left and right, just a few meters off the sand. There were no problems getting the kite to respond to corrections. It's definitely an easy kite to fly!
Some Basic Aerobatics
It was time for some real fun now: loops to the right, loops to the left. It was a struggle to keep them reasonably accurate and round. I was thinking "more curvature, less curvature" rather than "left" or "right." It worked for me, helping to avoid disorientation.
The logical next step was to combine left and right loops into some horizontal eights.
Also, a few tentative square turns were tried, going from horizontal flight to vertical, courtesy of a hefty yank on one line. And back again, while occasionally successful attempts were made to keep the flight path on a straight line between turns.
What to try next? Let's see... vertical eights or square loops perhaps? A clover leaf? That would look OK from a distance wouldn't it!
Peter Powell Kite Review:
Conclusions
It would have been nice to have flown in stronger wind, for this review. However, the breezier periods left me with no doubts that this kite ticks all the boxes as a family-oriented stunt kite.
The build quality is great, setup is designed to be almost ridiculously easy, and I suspect it has an enormous wind range. In future, we'll be taking it out in windy weather, with no qualms!
As mentioned earlier, there's more kite-making on this site than you can poke a stick at :-)
Want to know the most convenient way of using it all?
The Big MBK E-book Bundle is a collection of downloads—printable PDF files which provide step-by-step instructions for many kites large and small.
Every kite in every MBK series.
