- Home Page
- Accessories
- Kite Tails
Making Kite Tails
For the MBK Kites
Here's a handy way to make kite tails for all the MBK kites. See the
photos and some comments showing you how to make plastic rings and then
loop them together.
 MBK 1-Skewer Rokakku
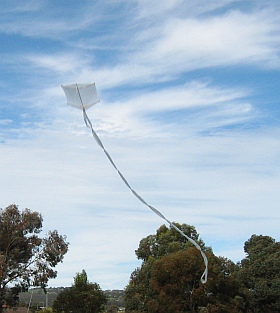
The photo shows a 1-Skewer Rokkaku kite in flight, sporting a long tail made from rings of clear freezer-bag plastic.
As described in some of the kite-making instructions, simple streamer tails are quicker to make. However, the following technique using plastic loops certainly works great and looks great.
By varying the width of the loops and choosing different-sized bags, you can come up with tails to suit just about any size of kite. Specifically:
- 1-Skewer kites—two average adult finger-widths
- 2-Skewer kites—three average adult finger-widths
- Dowel kites—one average adult palm-width
Often essential for smaller kites, a tail improves the directional stability. This just means that the kite now has a strong tendency to point its nose into the wind when aloft.
On steerable multi-line kites, a long tail looks spectacular and traces out the movement of the kite through the air.
On this site, there's more kite-making info than you can poke a stick at. :-)
Want to know the most convenient way of using it all?
The Big MBK E-book Bundle is a collection of downloads—printable PDF files which provide step-by-step instructions for many kites large and small.
Every kite in every MBK series.
Kite Tails From Bags
Step by Step

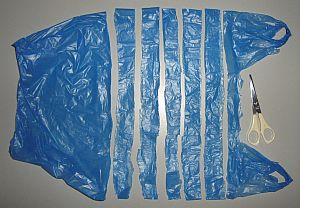
1. Once you have got the knack of making kite tails this way, you can just use any kind of clear or colored plastic bags or garbage bags. It's a small blue-plastic shopping bag in the photo.

2. First, if the bag has handles, cut straight across to remove them. Then keep cutting straight across to create rings as shown.
Accuracy is not important here. In fact, ragged edges might work better!

3. Throw away the handles, if any, and also the closed bottom of the bag.
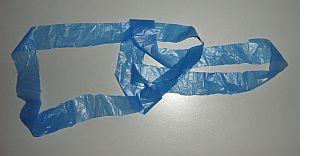
Now take two rings and loop them together as in the photo.

4. Gently pull the two rings fairly tight, then attach more rings in the same way.
Keep going until you have the required length of tail according to the instructions for the kite. Usually, it's in terms of the kite's height. For example, it might say "at least six times as long as the kite itself."
If a kite's tail is a bit longer than specified, that doesn't matter at all! Bear in mind that very long tails will make your kite fly lower. Making tails just long enough to keep the kite stable is the best idea!
That's all there is to making kite tails for the MBK designs. Feel free to experiment with other ideas too. You could try combining simple streamers and loops, for example.
As mentioned earlier, there's more kite making on this site than you can poke a stick at. :-)
Want to know the most convenient way of using it all?
The Big MBK E-book Bundle is a collection of downloads—printable PDF files that provide step-by-step instructions for many kites large and small.
That's every kite in every MBK series.
