- Home Page
- Better Kites
- ... Box Kite
How to Make a Box Kite
Step by Step—Page 1 of 3
The MBK 1-Skewer Box
This set of instructions on how to make a box kite assumes you know absolutely nothing about kite making. You might already have some of the simple tools and materials required. Anything you don't have is easily bought.
 MBK 1-Skewer Box
If it's not exactly what I used, then at least something pretty similar!
The instructions on how to make a box kite might look quite long, but each step is simple to do. Just quickly work your way through, skimming over any detail that you don't need. All in all, it should be quite hard to make a mistake!
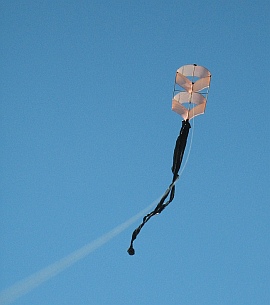
The MBK 1-Skewer Box kite is rather small at just 29 cm (11 1/2 in.) long, with cell panels measuring 14.5 cm x 8.7 cm (5 3/4 in. x 3 1/2 in.). It will stay airborne in moderate winds but does even better in fresh winds.
Larger box kites don't need a tail, but my original 1-Skewer version was much happier in the air with a decent length of light plastic attached to the lower corner. If there were such a thing as 2 mm diameter bamboo skewers, the little box could probably go tailless!
Like all the other MBK 1-Skewer kites, this design can't be taken apart for transport. However, that's not much of a problem due to its small size! Just be sure to treat it with care when handling or transporting it.
On this site, there's more kite-making info than you can poke a stick at. :-)
Want to know the most convenient way of using it all?
The Big MBK E-book Bundle is a collection of downloads—printable PDF files which provide step-by-step instructions for many kites large and small.
That's every kite in every MBK series.
How to Make a Box Kite
Frame

- Select four bamboo BBQ skewers that seem fairly straight. Check this by rolling them across a tabletop, one by one. Or just look down their length.
- In addition, try to ensure that two of those skewers have very similar flexibility. Either bend them by hand to try and judge this, or get a little more ingenious by suspending the ends and putting a weight in the middle. Getting this right will help the finished kite to fly straight without needing too much tail. Put a mark on these two skewers so you know which ones they are. They are the top two spars in the photo.
- Snip the point off one skewer, then measure it to establish one skewer length (1.0 SL) for your kite. For me, this was 29 cm.
- Snip the points off the other three skewers to exactly the same length as the first one. These four skewers will now be referred to as the spars.
- Take another two skewers, and snip one of them to exactly 0.7 SL (20.3 cm, 8 in.) in length. Make the other one just 0.5 cm (1/4 in.) longer. These are the cross pieces. The longer one will be trimmed to fit, later.
How to Make a Box Kite
Sail

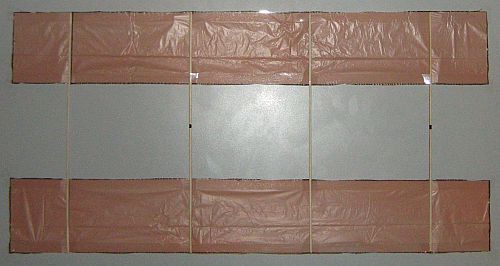
The template up there represents one cell of the kite, laid out flat. Now we will transfer the measurements to the sail plastic.
Like to see a video clip? Just scroll down to near the end of this page.

- First, take a light single-ply plastic bag, and lay it flat on the table. I use cheap orange garden bags. The more expensive bags are usually two- or three-ply plastic, which is heavier and less see-through.
- Near one edge of the bag, measure and mark a rectangular outline according to the template. Use a black marking pen and ruler.
- Now measure and mark the fold lines—see the photo.
- Flip the bag over, and trace over all the black lines. Use the ruler, of course!

- Cut the bag down one side, and open it out.
- Cut around the two rectangular outlines with scissors. I don't recommend trying to do both rectangles at once, since the plastic tends to slip!
- Arrange the four bamboo spars over the plastic as in the photo, covering up the drawn fold lines. Make sure the marked side spars are positioned as shown in the photo.
- Tack down all eight corners of the sails to the tabletop with small square pieces of sticking tape. This stops unintended shifting of the plastic while you are trying to:
- Lay down four long lengths of clear sticking tape, securing the spars to the plastic. The tape is just visible in the photo; look for where the plastic is smoother and slightly darker near the edges. Each tape goes all the way from left to right over the four spars.

- Remove everything from the tabletop, either pulling off or trimming away the small square bits of tape at the corners.
- Fold the sails, bringing the short edges together and sticking them with tape. The photo gets closeup on one of the two joins.
- Now open the box kite out, and carefully lay down tape along the inside edges as well to make the two joins even more secure—a bit tricky, so take your time!
The video up there shows an extra tail in action, trimming the kite straight. You will need to experiment a little, since adding too much side-tail will make the kite loop around in the opposite direction.
As mentioned earlier, there's more kite making on this site than you can poke a stick at. :-)
Want to know the most convenient way of using it all?
The Big MBK E-book Bundle is a collection of downloads—printable PDF files which provide step-by-step instructions for many kites large and small.
That's every kite in every MBK series.
