- Home Page
- Better Kites
- ... Rokkaku Kite
How to Build a Rokkaku Kite
Step by Step—Page 1 of 3
The MBK 2-Skewer Rokkaku
This set of instructions on how to build a rokkaku kite assumes you know absolutely nothing about kite making. You might already have some of the simple tools and materials required.
 MBK 2-Skewer Rokkaku
Anything you don't have is easily bought. If it's not exactly what I used, then at least something pretty similar!
The MBK 2-Skewer Rokkaku kite is a medium-sized rokkaku 58 cm (23 in.) across and 73 cm (29 in.) tall.
Some dihedral on both the horizontal spars gives ample stability for flight without a tail.
Also, the bridle allows the lower spar to bend a little more when the wind picks up, giving a bit more stability when needed.
This 2-Skewer Rokkaku is an efficient light-wind flyer. Take it out when it seems there's barely enough wind to fly!
When looking at this kite, I am always reminded of the day when someone came walking across the flying field. They traversed the entire field from corner to corner without realizing that the rok was directly above at around 200 feet—with me staring up at "nothing." :-)

On this site, there's more kite-making info than you can poke a stick at. :-)
Want to know the most convenient way of using it all?
The Big MBK E-book Bundle is a collection of downloads—printable PDF files which provide step-by-step instructions for many kites large and small.
That's every kite in every MBK series.
How to Build a Rokkaku Kite
Sail
Now's the time to read up on the tools and materials required for making a Skewer Series kite, if you haven't already.

The template shown above represents one side of the kite sail. You will now transfer these measurements to the sail plastic.
Like to see a video clip? Just scroll down to near the end of this page.


- Take a light plastic bag that will fit the entire template shape within one side, and lay it flat on the floor.
- Mark dots on the plastic, corresponding to the corners of the template. There is no need to use a T-square, since any small error will be duplicated on the other side of the sail. And it will make hardly any difference to how the kite flies.
- Using the marking pen, rule lines between the dots to create the template shape.


- Flip the plastic bag over, and trace over all the black lines using your marker pen and ruler.
- Cut out a rectangular section of the bag containing the kite sail.
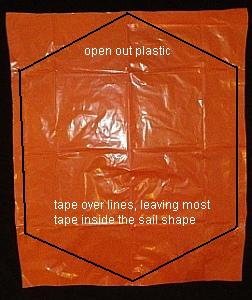

- Open out the bag, and lay it flat on the floor; you can now see the complete sail outline as in the first photo.
- Run clear sticky tape along every straight line, leaving most of the tape on the inside of the sail edges.
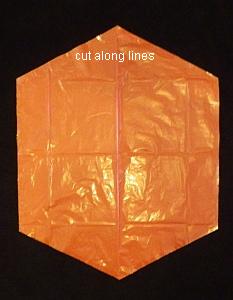
- Cut along the black lines with scissors to create the sail. See the closeup photo.
As mentioned earlier, there's more kite making on this site than you can poke a stick at. :-)
Want to know the most convenient way of using it all?
The Big MBK E-book Bundle is a collection of downloads—printable PDF files which provide step-by-step instructions for many kites large and small.
That's every kite in every MBK series.
