- Home Page
- Better Kites
- ... Dopero Kite
How to Make a Dopero Kite
Step-by-Step—Page 2 of 4
How to Make a Dopero Kite
Spars
For this dopero, you need long lengths of 5 mm (3/16 in.) wooden dowel. Enough for the four spars of 1.0 DL (120 cm, 48 in.) each. They are easily cut to the lengths required with a small cheap hacksaw.

- Select the straightest piece of dowel you can find. Measure off two 1.0 DL (120 cm, 48 in.) lengths, mark them and saw them off at the marks. Round off the tips with a wood file. These are the two vertical spars.
- Cut off two very short 0.01 DL (1.2 cm, 1/2 in.) lengths of dowel. Round off the tips with a wood file. These will be used as the bow-line toggles. You can use thinner dowel for these if you have some lying around. I use 4 mm dowel for toggles, just to save a bit of weight.
- Lay down some more dowel across the width of the upper sail, mark it at the exact width, and cut off at the mark. Also make an easily seen mark around the dowel where it touches the center crease of the sail.
- Round off the tips with a wood file, then add a bow line so the depth of the bow is 0.08 DL (9.6 cm, 3 3/4 in.). With the kite flat on the ground, that's how far the tips should be from the grass. This is the upper horizontal spar.
- While the glue is drying on the knots, do those previous two steps again to create the lower horizontal spar. For this kite, the amount of bow is the same for both spars.
How to Make a Dopero Kite
Joining the Sails
The upper and lower sails now need to be joined where the vertical spars cross:

- Lay the vertical spars down over the two sails, and line up the upper tips with the nose corners of the upper sail. Also line up the lower tips with the bottom corners of the lower sail. With all the plastic flattened against the table or floor, this shows you exactly how far apart the two sails should be.
- Check that the sail is quite flat everywhere, with no folds or creases. Double check that everything lines up and looks square.
- Add four strips of clear sticky tape onto the sails, as illustrated by the yellow rectangles in the top photo. Yes, the tapes might stick a bit to the floor, between the sails, but...
- Flip the sails over, and stick down another four strips of tape of exactly the same size and position, so they stick to the first four tapes in the area between the sails. The exact length is not important; just copy the photo.
- Now that the sails are joined, flip the plastic over again, and add another four lengths of tape to the lower sail. That's two tapes beside each spar, as the middle photo shows.
- Finally, add two lengths of tape to the upper sail. See the bottom photo.
How to Make a Dopero Kite
Tabs and Spar Caps
Prepare 10 lengths of electrical insulation tape, each one about four times longer than it is wide. Stick them by a corner onto something handy like a table edge. You can remove them one at a time as needed.

- Spread out the sail, with the edge tape facing upward.
- Lay down the upper horizontal spar over the sail, so it would bow away from the sail if you attached the toggle. With the toggle unattached, line up the tips of the spar with the upper corners of the sail.
- Cap one tip of the spar with tape, by sticking tape down over the dowel and plastic then folding it around and under the plastic to stick on the other side—a bit tricky, so take your time! See the completed cap in the first photo.
- Now do the other tip of the spar similarly, using another piece of tape.
- Attach both tips of the lower horizontal spar to the sail in a similar same way, using another two pieces of tape. Also wrap tape around the dowel at 90 degrees to the first pieces. It looks much neater!
- The outer long tabs of the lower sail need to have a slit, to let the bow line through when the tab is folded over. Make a short vertical snip with scissors, in each tab, right down to the bow line knot.
- Fold down the plastic tabs over the spar and tape in place using clear sticky tape. See the second photo, which shows one side of the kite.
- Now slip the vertical spars into place, sliding them between the horizontal spar and the sail plastic at the crossing points.
- Cap
the vertical spars with the remaining four pieces of tape, attaching them
to the top corners of the upper sail and the bottom corners of the lower sail.
How to Make a Dopero Kite
Lashing the Spars
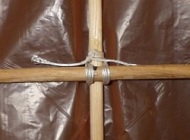
The two horizontal spars will now be lashed to the vertical spars. First, just make sure that everything looks right, with no bunched up plastic anywhere.
After putting several turns of flying line around each crossing point, fix the joins with a generous drop of glue each. This will also prevent any shifting along the vertical spars.
How to Make a Dopero Kite
Sail Ties

- Add a short length of clear sticky tape to an upper sail corner, then add another one of the same length to the other side of the plastic. Where they stick out from the sail edge, press the two tapes together so they stick to each other. About the length of a forefinger should be sufficient—half on the sail, half off.
- Put a Loop knot into a length of flying line, and thread the tapes through the loop, before folding the tapes over and securing them to the sail with another short length of tape.
- As in the photo, snip off the line so you have enough length to fasten it to the lower horizontal spar with some Half Hitchs. There should be a little slack in the line, but not as much as in that photo!
- Do
the other sail corner exactly the same way. The exact length of the
ties is not important, but do try to get them the same as each other.

As mentioned earlier, there's more kite making on this site than you can poke a stick at :-)
Want to know the most convenient way of using it all?
The Big MBK E-book Bundle is a collection of downloads — printable PDF files which provide step-by-step instructions for many kites large and small.
Every kite in every MBK series.
